Saturday, December 28, 2013

Holiday Cards

I've been meaning to make cards more often, but truthfully I've only made less than a dozen or so since I started crafting a few years back.  I made these cards just by layering some scraps, images from Pinterest, and a few embellishments.  I thought they turned out cute considering.


Gina's Designs Products Used:

Altered Cigar Box for my Swap Partner

This year some of the members on the Gina's Designs Team decided to participate in a gift and goodie swap.  It was a lot of fun decorating this unfinished cigar box from Michael's for my swap partner Angela.  I began with paper in soft muted tones.  I applied the paper with gel medium and put another coat of gel medium over the top.  I decoupaged doilies and a dragonfly image on top of the base paper.  I added a die cut frame and a chipboard frame on top of that and also coated with the gel medium.  The embellishments are mainly crocheted appliques, a fabric flower, a cameo from the dollar store, and paper butterflies.  I also applied a beautiful multi-colored lace trim on the sides and coated it with gel medium.  On the outside of the top lid I applied some beaded trim and secured it with more gel medium.


On the inside I decoupaged more design paper and some die cut birds


Closeup of the inside lid.

Gina's Designs Products Used:


Other Products:
Papers by DCWV
Bird Die Cuts by DCWV
Golden self-leveling gel medium
Flower Appliques by Delightful Designer and Raviolee Dream on Etsy
Tim Holtz feet
Butterflies by Renea Bouquets on Etsy


Thursday, December 26, 2013

Reindeer Games 12 x 12 Layout

This layout features my dog Friday.  I took this photo last Christmas but never had a chance to scrap it.  I cut the layered wreath with my cricut using a free svg file from svgcuts.com.   The red doily underneath the wreath is cut from a Martha Stewart punch.   The banner was fussy cut from design paper, and popped up off the page.  Then I added additional embellishments on top of it to make it even more dimensional.


Gina's Designs Products Used:
Winter Shape Set (the title)
banner border strips

Other Products:
Martha Stewart Circle Edge Punch in Rounded Leaf
Tim Holtz Sizzlets Decorative Strip Die - Festive Greenery
My Mind's Eye All is Bright Collection - Noel
BoBunny Blitzen Collection
Prima Flowers


Thursday, December 19, 2013

There really is a Santa Claus!

Here is my newest layout featuring my Frankie.  Here he is watching in amazement as Santa crosses overhead on Christmas Eve.  I began with some BoBuuny design paper and applied some Japanese lace paper with gel medium over the center to create the look of swirling snow.


Gina's Designs Products Used:
Santa and Sleigh Shape Set (available soon or by request)
Other Products:
BoBunny Design Paper (Blitzen Collection)
Japanese Lace Paper (available online at Dick Blick art supplies)
Prima Vintage Trinkets (resin bird)
Prima resin lamppost (shabby chic treasures)
Prima say-it-in-crystals bling
Flowers by Prima and Petaloo
Prima Junkyard findings (zipper)
glossy accents
glitter glue
Tim Holtz frosted film (on the windows)
clear glass microbeads
The moon image was found online and printed out

Monday, December 16, 2013

Home Decor or Photo Display Tray

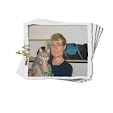
Today I'm sharing one of our Photo Display Trays which I've used as a Christmas home decor project.  This project could be hung on my wall as part of my Holiday display, or perhaps placed on an easel on my mantel.  These display trays come in a variety of designs and themes, from Steampunk to pets and children. This is the fourth one I've made!  I love how simple they are to decorate, with or without photos.


In addition to the tray itself, which I painted in cardinal red, I also added some Gina's Designs chipboard shapes to my tray.  Closeups are below explaining how I colored and decorated the ornament and the snowman:


For the snowman:

If you're after a vintage look, as I was, try inking instead of painting.  First dry brush the pieces with a thick gesso and a fan shaped brush, using very little paint on the brush.  You can always add more.  On mine you can see the natural chipboard peeking through.  I didn't want complete coverage, making it look more vintage and shabby.  The fan brush helps achieve a light coverage.  After the gesso was completely dry, I simply colored with Tim Holtz distress inks in Christmas colors using cosmetic sponges to apply the ink.  Note that the hat is naturally highlighted by using more ink at the edges.  I really like the effect.  I wanted my snowman to wear a vest, so I used the holly leaf shapes from the shape set to make a vest :)

For the ornament:


This was really simple to decorate with embossing powder.  No need to paint the chipboard if your embossing ink is nice and wet.  I used Stampendous shabby embossing powder in white.  The shabby embossing powders are multi-colored, and this one has flecks of gold in it so it's a nice one-step process.  After the embossing, I applied Tim Holtz frosted film.  Simply cut a piece from the roll that's big enough to cover your ornament.  Trace the circle, then cut the film just inside your trace line.  Apply the film to the back of your ornament.  The sticky side will be up.  Shake some clear glass microbeads all over the sticky area. Tap the ornament to remove excess beads onto a piece of paper so you can return the excess beads to your container.  Add some bling gems.  For a sturdier ornament to hang on the tree, you could also back these with plain paper, painted chipboard, or design paper, and/or sandwich the frosted film in between.  Fun!

Gina's Designs Products used:

Ornaments Shape Set (not available online, at brick and mortar stores only)

Other Products Used:

Folk Art paint in Cardinal Red
Gesso
Fan Brush
Tim Holtz Distress Ink in Black Soot, Iced Spruce, Pine Needle, and Festive Berries
Recollections bling and the little Christmas packages also by Recollections
Tim Holtz tattered poinsettia die
Design paper by My Mind's Eye (All is Bright collection)
Tim Holtz movers and shapers die (mini reindeer and 25 set) - ( I used the 25 at the bottom left of the tray)