Thursday, March 27, 2014

Challenge Entries at Kathryn's Scrappers

I have entered both the layout challenge and the card challenge at Kathryn's Scrappers on Facebook this week.  The challenges are simple to follow sketches and best of all they are stash busting.  That's something most of us need to do.  It's fun to create just for fun for a change, and to use up some stash!

This Week's Card Sketch:


My Take:


Layout Challenge:


My Take:  Journaling to be added in the lined areas by my daughter


Stop Everything Today & Dance

More fun with Billie Jean and the Scraps of Darkness March kit.  Billie Jean loves to pose for the camera!

Tuesday, March 25, 2014

April Showers Bring May Flowers - Scraps of Darkness Kit Club

Today I'm sharing a layout I created with the March kit from Scraps of Darkness called Radioactive.  The photos are my dog Billie Jean taken when she was still a pup.  It was the day of the April Parade For Pups to benefit the shelter where I was working at the time.  I found a raincoat in the supply room of the shelter.  It was a bit small for her, but she was so excited to be part of the parade.  We all got soaking wet that morning, but the sun came out and shined brightly that afternoon.


I love the bright colors in this kit although they are not colors I'm used to working with.  I really enjoyed challenging myself, and the papers are really pretty.  I mostly followed the sketch that comes with the kit, and added some chipboard shapes from Gina's Designs.

Products Used:

Gina's Designs Chipboard Shapes
Prima Flowers
Butterfly by Renea Bouquets


Whimsical Mushrooms ATC Display Tray

Hi everyone!  Today I'm sharing this ATC Display Tray by Gina's Designs.  I love all things nature inspired, and when I can add more than a touch of whimsy to the project, then that's all the better!  When Gina designed these chipboard mushroom shapes, I knew I needed to have them.  I had lots of ideas on where I'd use them, and when I came upon this amazing mushroom paper by Ephemera's Vintage Garden, perfectly sized for ATC's, I knew it would be a match made in Whimsy Heaven.  Naturally, this Display Tray is a perfect way to display your ATC's, but I had fun embellishing all the little squares, and creating a different adventure in each one.   Thanks for looking!

Gina's Designs Products Used:

Sticks and branches from various pieces

Other:
Prima Flowers
Stampendous shabby embossing powders
Various dried items and feathers from my stash


Wednesday, March 19, 2014

Remember 2 Live Your Dream - Once Upon A Sketch

Today I'm sharing my entry to the Once Upon A Sketch Challenge.  This is my first time entering, and I was so inspired by the quote (below) which is this months theme.

I'm happy to see my daughter taking control of her life, rather than sitting in the passenger seat.  Maggie overcame a lot of obstacles earlier in her life, and has come out strong in spite of it.

Below is the sketch:


My take on the sketch:


Tuesday, March 18, 2014

Layout with Scraps of Darkness February Kit

Here is yet another layout featuring my daughter Maggie created with the Scraps of Darkness February kit called "A Touch of Grey".  The layout contains papers from the main kit, coordinating paper and embellishment add-ons.  I used lots of die cuts from the embellishment add-on, and the metal clock from the main kit.  I had so much fun creating these kit layouts, and they are so easy because you can just decide what items and papers you want to use, then just put it all together.  It sounds easy, but yes, it really was!


Products Used:
Scraps of Darkness February Kit
Flowers from my stash
Velvet flower by Tresors Deluxe on Etsy
Lace appliques from Raviolee Dreams on Etsy

Hi everyone!  Today I'm sharing this trinket box you can purchase at Gina's Designs.  At a generous 7 inches square, this is a good sized box with lots of room for decorating and embellishing.  I decorated the box as a pet memorial for my beloved Willie.  It contains a cast of his paw print, a disk of photos, and a little kitty angel book signed by all of the doctors and staff at the veterinary cancer care center after his passing.  I treasure this box, and every memory it holds.  The embellishments are mainly flowers and some pearl sprigs from CraftSupplies1.


I crackle painted the box and added Tim Holtz feet.  The corners and the frame around the photo are from Gina's Designs.  The resin bridge is by Prima.


Gina's Design's Products used:

Decorative Corners (available soon)

Other Products:
Flowers and pearl sprigs from CraftSupplies1
Tim Holtz Feet
Resin Bridge by Prima
Folk Art paints
White School Glue (used as a crackle medium)

Saturday, March 15, 2014

Altered Wooden Purse for Ephemera's Vintage Garden

This altered purse is a Design Team project for Ephemera's Vintage Garden.  I bought the purse at Michaels in the unfinished wood section.  I'd always though they were adorable, but had never tried altering one.  I had so much fun creating it, and it's a very quick project.  I love the collage style of the digital papers I had to work with.  It really makes the decorating so easy.  The papers I used are from the Shabby Chic Mashup paper add-on.  It's a set of 8 printable double-sided pages designed for 4 x 6 mini journals.  They are a "mashup" of several other designs in Debbie's current digital minis line, and were designed to coordinate.  

The photo below is the front of the purse:

 I adhered the papers to the wood with matte Mod Podge and gave it a good heavy topcoat so the purse can be wiped with a damp cloth.  I used some chipboard shapes from Gina's Designs including the tiny dressform, the lacy trim at the bottom, and the key plate.  I mostly embossed the chipboard.  I replaced the wooden handle that came with the purse with an inexpensive one from Ace hardware and I distressed it with Gilder's Paste.  Flowers, feathers, and  metal pieces were all stash items.

Photo below is the back of the purse:

Below is the side where you can see how I used washi tape and hand stamping to decorate.  I used Tim Holtz metal feet to display the purse so it's standing up on my dresser.  I had planned on gifting it, but I can't part with it :)


This purse is my second Design Team project for Ephemera's Vintage Garden using the Shabby Chic Mashup add-on set.  There are more gorgeous papers in this set that I still haven't show you.  I will reveal more of them next month in an amazing wall decor piece that I am currently working on.  It's gorgeous and I can't wait to show it off!  Working with digital papers is amazing because you can print them out as many times as you'd like.  It's a great opportunity to have matching projects to decorate your space with.  Head over to Ephemera's Vintage Garden, to check out the gorgeous papers, and sign up for some amazing freebies HERE


Thursday, March 13, 2014

Layout using the Scraps of Darkness February kit

Here is another layout featuring my daughter Maggie and the Scraps of Darkness February kit called "A Touch of Grey".  Initially, I'd planned on working with only the main kit, but I loved everything so much I ended up purchasing items featured in the add-ons.  The paper is all from the main kit, as is the film reel stencil that I used in the upper left corner.  I filled in the stencil with Tim Holtz black soot distress ink.  The skeleton clock at the bottom left is also in the main kit.  It is made of metal, but I dabbed it heavily with white gesso to match the look I was after.  I also used Prima's Everyday Vintage Paintables from the main kit, and I painted the piece with a touch of baby pink Prima chalk ink which I just dabbed onto my non stick mat and added a bit of water, then painted with a small brush.  I used the pink embossing powder which is included in the main kit on the left side of the page, and also on the filmstrip at left. I applied the embossing to a script stencil that I had in my stash.  From the embellishment add-on kit I used several die cuts, and a journaling spot.  Flowers are from my stash. I have fussy cut a rose from a sheet of paper from the coordinating paper add-on.  It just so happened, and being that I'm a pink girl, I had that sheet of paper in my stash.  Thanks for looking and for visiting my blog today!


Tuesday, March 11, 2014

Layout - A Burst of Spring!

Today I'm sharing my first project I've created for the month long cross promotional with Gina's Designs and CraftSupplies1.  This layout features my Willie boy.  The photo was taken on the day he came to live with me in the Spring of 2001.  He passed away early last Summer and I like to think he's still enjoying the gorgeous flowers in some other realm.  I really loaded this one up, and I have it hanging on my wall in a deep shadowbox frame behind protective glass.  Most of the flowers I used are from CraftSupplies1.  As soon as I saw these gorgeous flowers, I knew exactly what I was going to do with them.


Gina's Designs Products Used:

Lavender Flowers
Cream Roses
Two Tone Blue Roses
Two Tone Purple Roses
Lavender Roses
.50 inch Lace Trim

Other:
Design paper and cardstock die cuts by K & Company


Saturday, March 8, 2014

Altered Canvas in a vintage garden theme

Today I'm sharing one of my favorite themes again.  Nature!  Somehow for me, it's the theme that comes most easily, and gives me the most pleasure in creating.  I began with a simple application of gesso to the frame, then streaked it with some various colors of Folk Art acrylic paints.  When the paint was dry I added some Kroma Crackle.  This crackle product can take a couple of days to "cure" and finish crackling, so I just leave it and move on to other projects.  When it fully "cured", I rubbed on some Prima chalk inks in various colors to bring out the crackled finish.  I found a nature collage style of design paper in my stash that I'd picked up at Michael's, and I secured it to the back of the canvas with mod podge.  Now comes the fun part.  I began to gather my chippies and to ink, emboss and crackle them.  I looked through my "nature" stash and found nests, birds, eggs and mosses.  After that it only took an hour or so to decide on my final arrangement and to adhere the pieces to the canvas.  The gorgeous butterfly is by Renea Bouquets on etsy.


Gina's Designs Products Used:

Chipboard pieces have been colored with Prima Chalk Inks.  These are a great tool for coloring.  If you buy the big set you will have plenty of colors in the same family to use for shading.

Tree 3 ( a portion of the tree can be seen on the inside)
Topiary Trees (basic instructions are below the post on how I colored it)
Build-a-Layout Country Living (the wagon wheel) crackled with TH distress rock candy crackle paint
Ornate Corners (inner corner top right)
Fall Shape Set (the rake) colored with chalk ink then TH distrees embossing powder to look like rust

Coloring the Topiary:

I began with a light dry brushing of gesso followed by Prima Chalk Ink.  I "shaded" the pot by leaving the thinly coated white gesso uncolored in the center to give it a rounded look.  For the topiary, after I colored with shades of green chalk ink, I added some clear glass bead gel and left it to dry.  It will dry clear.  At that point you will have lots of texture from the beads that will be stuck to the chipboard.  I then rubbed on some Gilders Paste in Vertigris over the beads and along the edges.  Done!

Friday, March 7, 2014

Layout with Scraps Of Darkness February Kit

I call this layout "Dare You".  It features my daughter Maggie May on one of her modeling shoots.  Yes, it's a live snake EEK!  Maggie loves animals, even snakes, so she wasn't bothered by it in the least.  This was my first experience working with Scraps of Darkness, and I really enjoyed it!  You get lots of matching papers and coordinating embellishments, mixed media elements, and even a sketch that you can use as a guide.  There are add-on kits you can also purchase. For my layout I worked with the main kit, and I based my first layout on the sketch.  In addition to some of the kit papers I used flowers from the kit (the yellow ones). I embossed my flourishes (A sizzix die) and the film reel (an svg cutting file) with a script stamp and the pale pink embossing powder that came in the kit.  The steampunk doily ( on top of the film reel is by Gina's Designs)The butterflies are by Renea Bouquets on ETSY.  I have plenty of paper left for more layouts and projects, so watch for them soon!

Here is the sketch I worked with:


Here is my take on the sketch:


Wednesday, March 5, 2014

A 12 x12 layout for Ephemera's Vintage Garden and a new DT Announcement

Exciting news!  I have joined the Design Team for Ephemera's Vintage Garden!  I couldn't help but notice the gorgeous digital designs in the Etsy shop, and at the same time I wanted to try something fresh and new.  I wanted something that would combine well with my chipboard from Gina's Designs, and the multitude of designer flowers and other embellishments I already own.  Hybrid scrapbooking, using digital papers along with traditional elements,  seemed to really fit the bill. I love that I can print out as many of the images that I need.  I am so excited to have been invited to be a part of this team, and to share my first project.
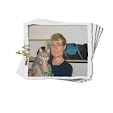
I chose to create a layout as my first project on the team.   I wanted to challenge myself to see how well these digital designs would combine with mixed media as well as traditional embellishments.  I love the shabby look, and the soft pastels.  I've featured my daughter Maggie May on one of her vintage clothing shopping sprees.

The background paper is a mostly plain paper from my stash, and all other paper, and paper layers,  are from Ephemera's Vintage Garden.   The digital papers I used are from the Shabby Chic Mashup paper add-on.  It's a set of 8 printable double-sided pages designed for 4 x 6 mini journals.  They are a "mashup" of several other designs in Debbie's current digital minis line, and were designed to coordinate.

Digital Products Used:
Digital Papers from Epemera's Vintage Garden (Shabby Chic Mashup)

Other Products:
Chipboard and small doilies from Gina's Designs
Petaloo Flowers
Dragonfly by Renea Bouquets
Liquitex Modeling Paste
The Crafter's Workshop stencils
Dylusions ink sprays
Prima Junkyard Findings


Monday, March 3, 2014

March Sketch Challenge at Gina's Designs.

Hi everyone, here we have our sketch challenge for March, revealed on the first Monday of each month.  You will have until the first Monday of the next month to upload your project, using the sketch, to our gallery.  Your entry must be entered into the area of the gallery designated for sketch challenges, and into the proper month.  You will find this in the categories section of our gallery in the upper right of the home page.  Winners will be chosen randomly by drawing from eligible entries and will receive a $10.00 gift certificate to the Gina's Designs online store.  Winners will be announced on the second Monday of the following month. We encourage you to use Gina's Designs products but it is not required to be eligible to win.

Below you will find the March sketch and my own sample entry.


Gina's Designs Products Used:


On this layout, I used some photos of me as a youngster.  Don't know how old I was, I couldn't find a date on the original.  On a recent visit, my Mom brought a lot of old photos and I scanned a bunch of them.  I'm excited to have some new photos to play with :)  Thanks for looking, and I hope you will enter our sketch challenge!