Showing posts with label altered item. Show all posts

Saturday, January 10, 2015

Fun with Gecko Galz Papercraft Challenge Group - Entry Number One


Today I'm sharing the first of my monthly entries into the Gecko Galz Papercrafting Challenge Group on Facebook.  Each month there are several fun challenges to enter, all with different themes.  You can enter as many times as you want for the opportunity to win free collage sheets.  
...............
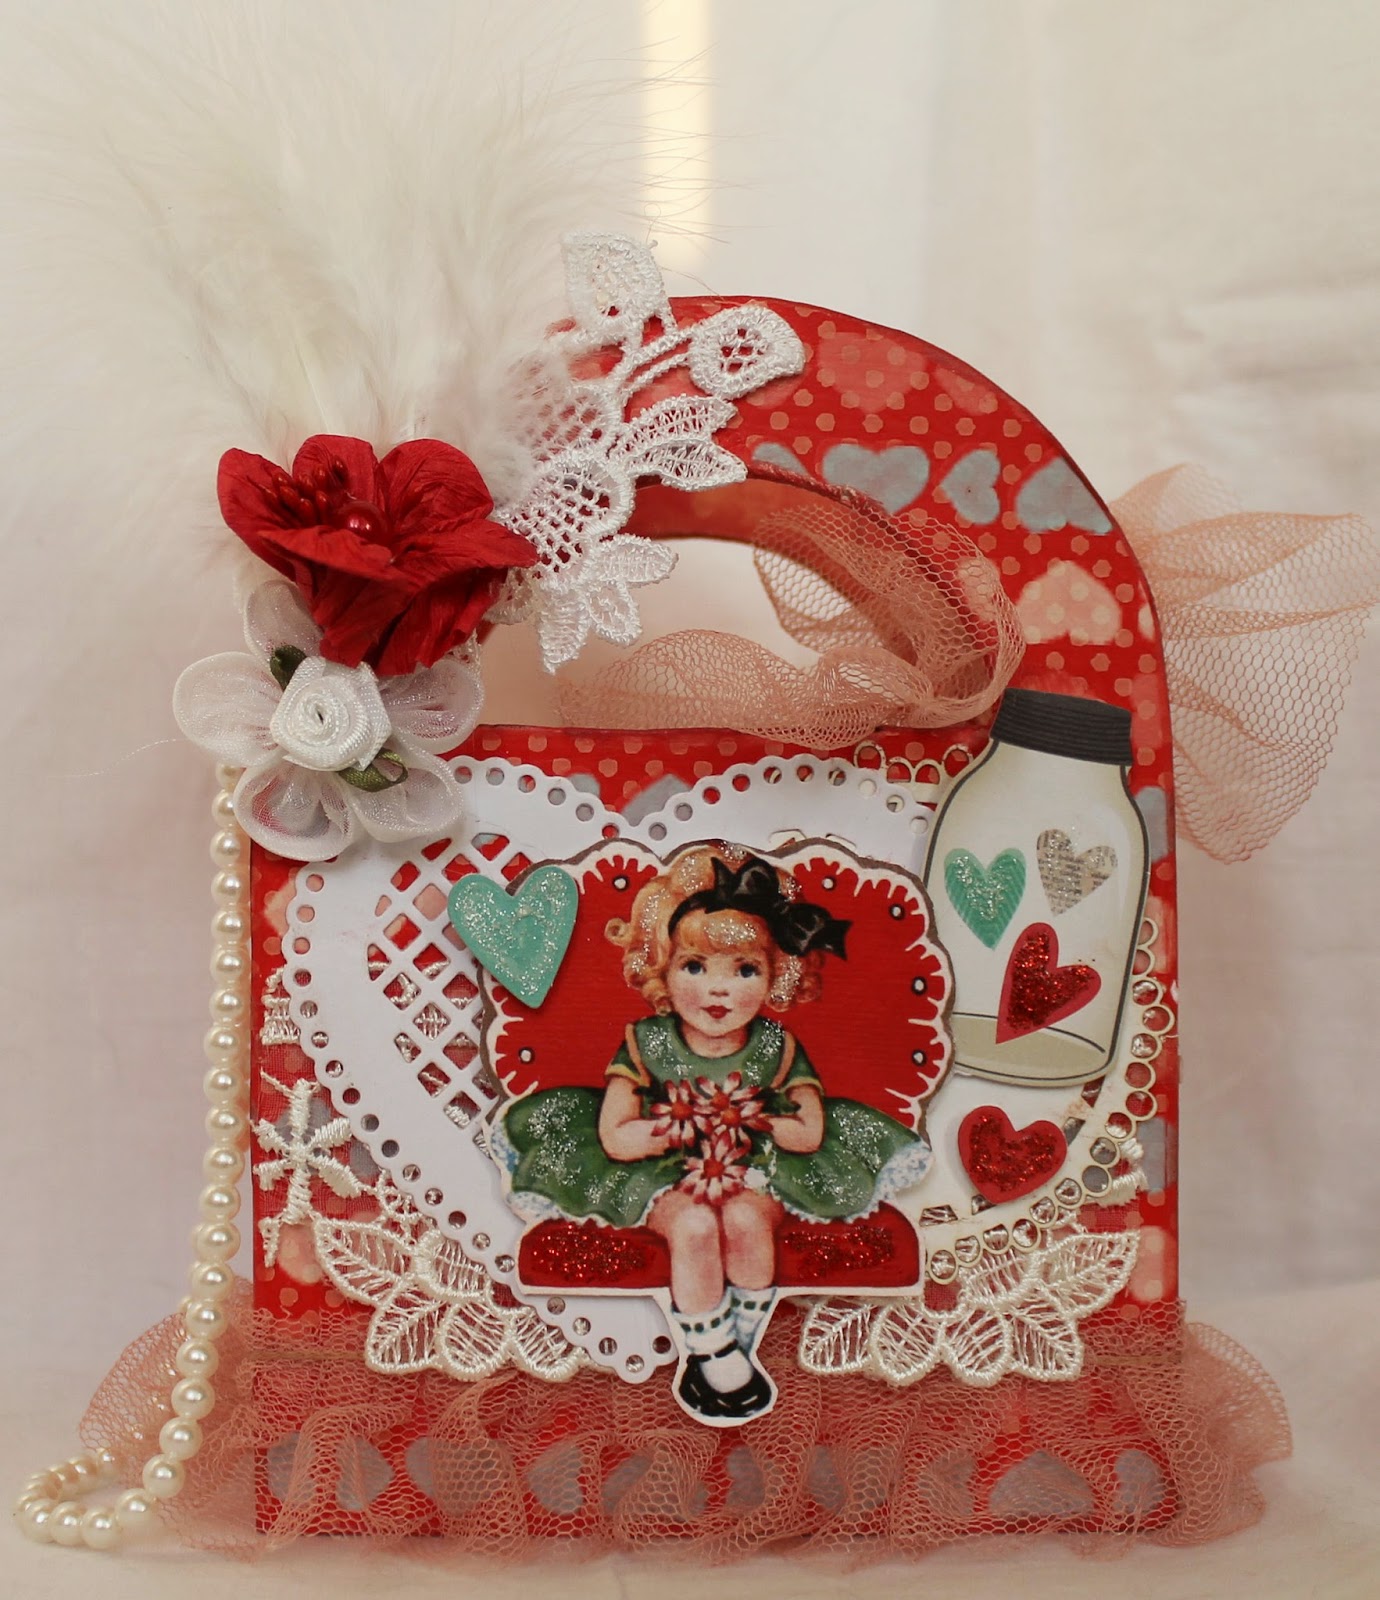
First up is my entry into the "Not A Card" challenge.  I altered this little wooden purse I got at Michael's a while back.  It's small,  with the work space (not including the handles) just short of 4 x 4 inches.  I covered the box with the brand new Valentine themed digital papers from My Artistic Adventures, using matte Mod Podge to adhere the paper.  The papers are gorgeous, and there are more matching paper sets in other patterns now available in the store.  The Vintage Valentine image is from the Gecko Galz - Very Vintage Valentine collage sheet.  I added a few laces and embellishments from my stash to complete, and I used my new heart shaped doily die from spellbinders.


I wish to enter this into the following challenges:

Crafting When We Can - Anything But A Card Challenge

Saturday, November 22, 2014

Whimsical Altered Box for Ephemera's Vintage Garden

Today I'm sharing a really fun box I created for Ephemera's Vintage Garden.  I used images and background papers from a set of digital printable art journal elements called A Happy Place.  I wanted to create something with a mixed media look and feel and with a touch of whimsey.  The papers themselves have paint splatters and blotches and I also added some of my own splatters and drips here and there, and some gesso to give it a real artsy look.  The papers and journal bits are designed to make creating an art journal both fun and easy, but there are so many other fun creations you can make in addition to your art journal.  I will be showing you more fun projects using this set next month.


Everything is very sturdy and coated with plenty of Mod Podge for durability so I can use this box for art supplies.  The flower on top is made of wood that I covered with more of the papers.  There are also more pieces, of both backgrounds and art bits available in this set which I will link to below.

Products:

Other parts of this set that are available:

Other Products Used:
Unfinished wooden cigar box from JoAnn's
Wooden Flower from Factory Direct Craft available online
Chipboard diamond texture sheet from Gina's Designs


Thursday, November 13, 2014

Vintage Victorian Winter Themed Diorama for Gina's Designs

This Diorama is one of the newer selections in our store, and it's my new favorite piece to work with.  The possibilities are endless for decorating in any theme you like.  This is a large piece at 5" wide, 5"deep and around 7" tall.  When assembled, the Diorama provides a spacious  triangular shaped niche on each of the four sides for you to decorate.  The top of the piece also provides a really large space.   This piece also comes with a lazy susan pedestal to attach to the bottom so it will turn.  I chose not to use the rotating base and opted to add some Tim Holtz feet instead.  I wanted my creation to have a wintery vintage Victorian feel, and I thought that the ornate feet best reflected the look I was after.  


After I assembled the piece, I gave it a light coat of gesso.  I papered the inside of the niches with canvas resist by Prima Finnabair Elementals in a music note pattern.  I needed two sheets and had scraps left over.  I stenciled over the canvas using a snowflake stencil,  first with Prima Chalk Ink in Old Rose, and then I used the same snowflake stencil with sparkle texture paste.  I added some gesso with a dry fan shaped brush here and there to distress. 

I covered the vertical framework of the piece with crackle texture paste, and distressed it with some gesso and a little light pink acrylic paint, and a little buttermilk acrylic paint.  The horizontal framework was covered with a sequined eyelash trim I got on ebay and had been hoarding.

The chipboard shapes were embossed with Stampendous shabby embossing powders in cream and in white.

The Victorian winter images were mostly freebies I found on Pinterest, along with a collage sheet from Gecko Galz called Christmas Icons.

Thanks for looking!

Gina's Designs Products Used:

Diorama (coming soon)

Tuesday, October 21, 2014

Shabby Book Box - Creative Team Project for Ephemera's Vintage Garden

Today I'm sharing a super shabby altered book box.  I have created some fun inside the box with the intent that it be displayed upright on my nightstand.  I just love how it came out, and I can't stop looking at the inside.  All of the papers as well as the tags and images inside the box, are part of the printable digital paper kit called Paris in My Heart by Ephemera's Vintage Garden.  Additionally, I have added some lace, doilies, flowers and other embellishments.  Inside I have created a flower from the digital papers and using the Tim Holtz Tattered Flower die.  This is my third project created with this collection.  I love that I can print what I want over and over again.  It is so gorgeous, perfect for any lover of shabby roses.  Thanks so much for looking!


Products Used:

Digital Design Paper by Ephemera's Vintage Garden
Paris in My Heart Collection

Check out Debbie's other gorgeous paper collections, and sign up for amazing weekly freebies HERE!


Other:
Chipboard corner piece on cover by Gina's Designs
Flowers by Petaloo
Prima Resins
Doilies and parchment flower cluster inside cover by Craftsupplies1
Butterflies by Renea Bouquets


Sunday, October 5, 2014

Shabby Chic Memory Tray for Ephemera's Vintage Garden

Hi Crafty Friends!  Today I am sharing a creative team project for Ephemera's Vintage Garden.  This Memory Tray features the digital paper kit called Paris in my Heart.  This is such a perfect gift for a lover of shabby chic Paris style, or I could just keep it all to myself.  What I love about digital paper kits is that I can always just print more paper and make another one.  This is the second project that I've created featuring this paper kit, and I hope you'll come back to see yet another that I plan to create later this month..


I have done some fussy cutting of some of the images in the paper and raised them up onto pop dots to create some extra dimension.  This tray did not take me long at all to decorate. The hardest part was in deciding which gorgeous paper to put in which square :)

I began by painting the tray with white gesso, then I used Tim Holtz tissue tape around the frame, and added some distress ink.  

Products:

Digital Design paper by Ephemera's Vintage Garden
Paris in my Heart printable kit

Wooden memory Tray by Recollections
Doilies and chipboard shapes (including the Eiffel tower) are from Gina's Designs
Tim Holtz tissue tape
Flowers by Prima and Petaloo
Butterflies by Renea Bouquets

Check out Debbie's other gorgeous papers, and sign up for amazing weekly freebies HERE!

Wednesday, October 1, 2014

Spooky Banner - GDT for Kitty's Scrap Post and $$$$ COUPON $$$$$

Hi Friends!  Here I am again with even more Halloween fun!  I created this very Gothic and a little bit creepy banner with a printable digital paper kit from Kitty's Scrap Post.  This kit is called Nevermore and is one of several paper kits that Luisa has designed in a Halloween Theme.  This is my second project using this paper kit, and I just love the images.  I might have to make some Halloween cards next :)

 If you haven't tried digital paper kits yet, or you want to add to an existing digital paper stash, then please visit the shop and remember to use this discount coupon for 15% off of your entire purchase.  ****Enter code NancyGDT15 to receive your discount!*****


Products used:

Digital Paper Kit by Kitty's Scrap Post

Decorative Cardstock Doilies by Gina's Designs


Tuesday, September 23, 2014

Halloween Graveyard - Design Team for Gina's Designs

This Standing Dome from the Home Decor section of Gina's Designs, comes in two styles.  This one has a solid back and the other style has a framed opening at the back.  I love both of them, but this one in particular, because it does remind me of a tombstone.  The piece wasn't designed for Halloween necessarily, but I couldn't help myself.  The 4-inch depth seemed like such a likely spot for these skeletons to hang out.  


I painted the assembled piece black, then dry brushed some orange in places.  I also adhered some packaged spider webbing from the Halloween section of the dollar store with gel medium for extra texture, and melted it into the paints with my heat gun.  I also spread on a bit of glass bead gel and brass colored distress paint.  For the mossy look I added green acrylic paint with a dry brush.   I don't usually start with a plan, I just keep adding color and texture until I achieve the look I want.

Gina's Designs Products Used:

Collage Sheet Images by:
Seneca Pond Crafts
Alpha Stamps

Monday, September 22, 2014

Halloween Fun with Kitty's Scrap Post + $$$ COUPON $$$


Hello my Crafty Friends!  I'm back today with more Halloween fun, and a DISCOUNT CODE!  If you're a follower then you know how much I love Halloween.  When I saw the Nevermore digital kit by Kitty's Scrap Post, I knew it had to be mine!  All of the background paper and printed images are from the kit.  For this project I have altered a Memory Tray by Recollections.  I had so much fun cutting out the images from the collage sheets that come with the kit.   I'm such a fan of digital kits these days, I love printing the paper as often as I want for multiple projects.  If you haven't tried digital paper kits yet, or you want to add to an existing digital paper stash, then please visit the shop and remember to use this discount coupon for 15% off of your entire purchase.  ****Enter code NancyGDT15 to receive your discount!*****


Products Used:
Digital Design papers by Kitty's Scrap Post
(Note:  The kit also comes with optional matching bottecaps and domino art)

Other:

Memory Tray by Recollections
Flowers by Petaloo
Spooky cat, fence and raven by Tim Holtz
Chipboard spider webs and flourish topper by Gina's Designs

Tuesday, September 16, 2014

Halloween Stage - Design Team Project for Gina's Designs

Hello Everyone, Today I'm sharing one of my favorite pieces from the Altered Art section of our store.  This is my second time working with the Stage.  This time around  I chose to create a Halloween project since it's my favorite theme to scrap this time of year.  


I began by painting my assembled stage in black, then I papered it with The Enchanted Collection by Authentique.  To decorate my stage I used various collage sheet images, and Gina's Designs chipboard shapes. 


Thanks for looking!

Gina's Designs Products Used:

Beach Shape Set (I used a portion of the fence)


Collage Sheet images from:
Retro Cafe Art
Seneca Pond Crafts


Alpha Stamps

Tuesday, August 19, 2014

Halloween Themed Composition Box by Gina's Designs


Hello Crafty Friends!  Today I'm sharing my version of the Composition Box by Gina's Designs.  Halloween is my favorite time of the year to scrap.  There are so many fun Halloween themes, and it's so hard to chose between witches, vamps, zombies, and other ghoulish themes,  that I usually end up making many projects during the Autumn months.  I knew as soon as Gina designed this awesome piece, exactly which numbers I'd choose.


Gina's Designs Products used:

Other:
Tim Holtz Halloween-themed stamps, rub-ons, and die
Collage sheets from Alpha Stamps
Collage sheet from Raiders of the Lost Art


Tuesday, July 15, 2014

Artist Trading Blocks for Gina's Designs

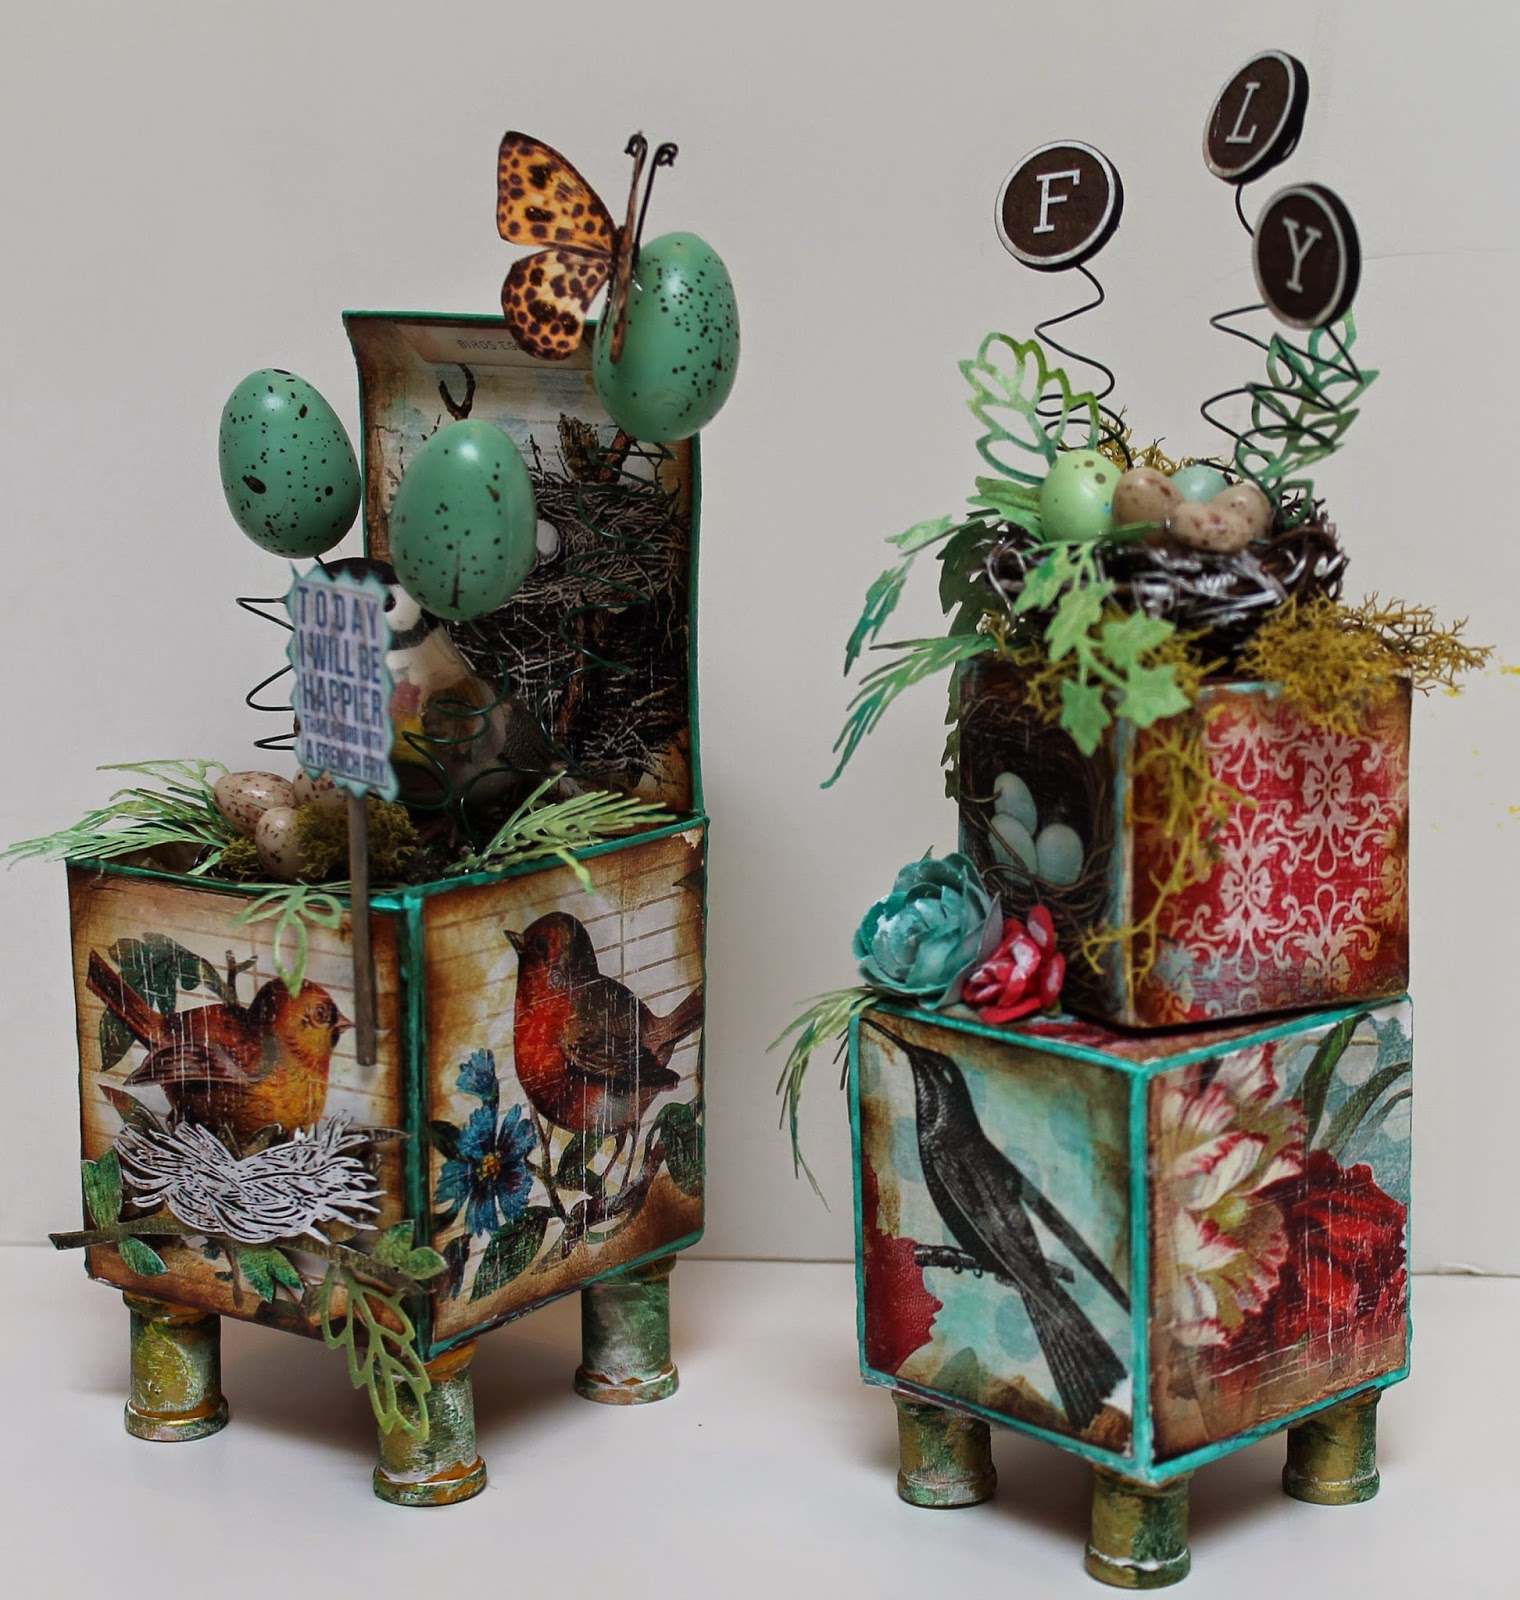
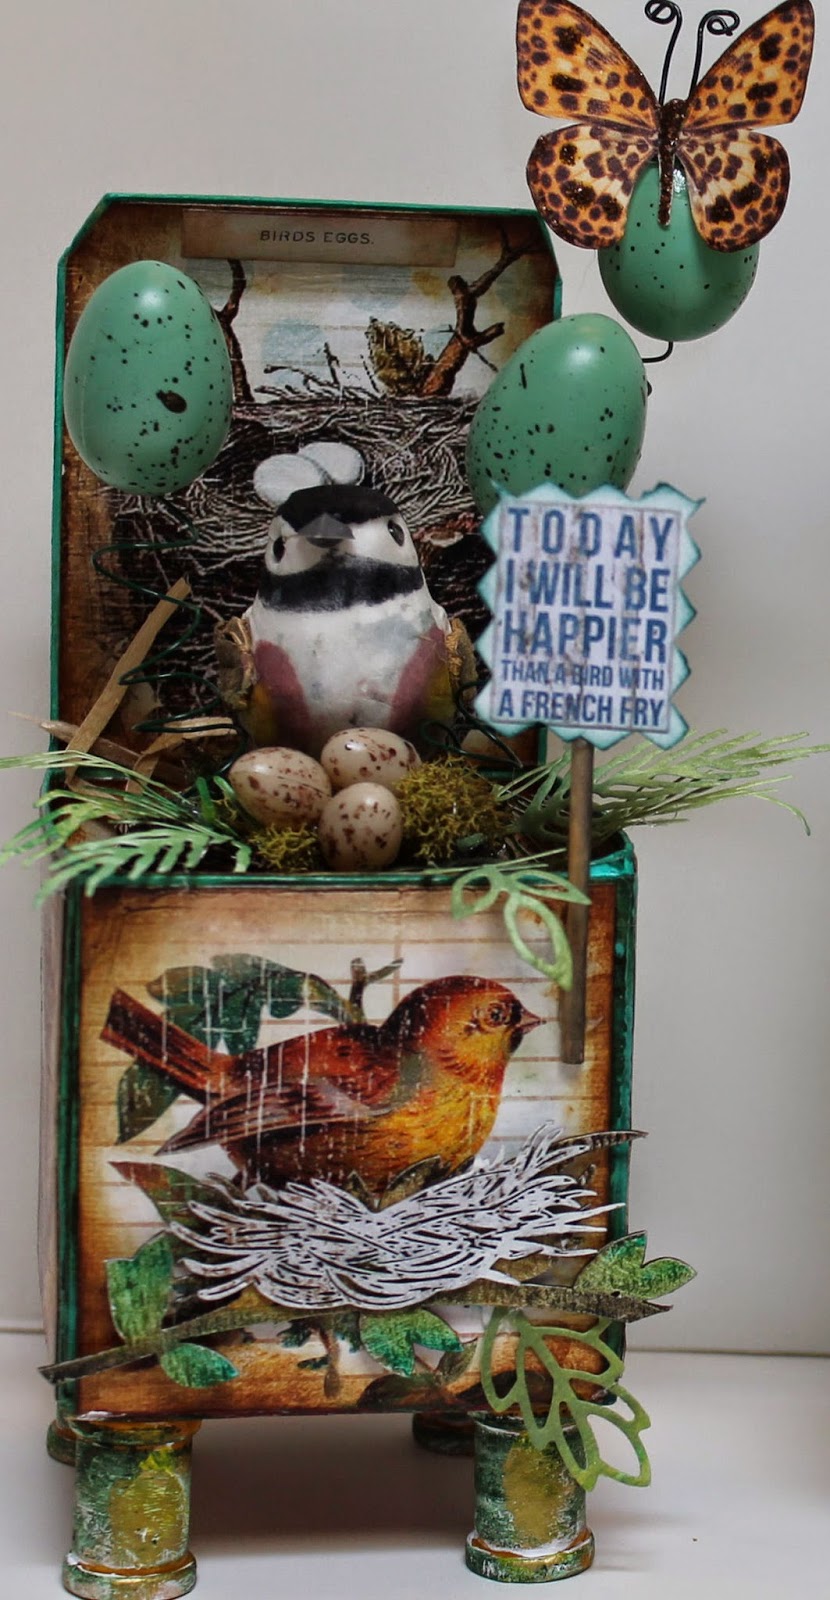
Hello Friends!  The team at Gina's Designs have been sharing these Artist Trading Blocks all this month, and it's been amazing to see all the different versions of these fun and versatile blocks.  I decided on a bird theme for mine.  I used the large block separately and left the top cover open,  and I stacked the smaller ones together.  The blocks are made of chipboard and come ready to assemble using the pre-scored fold lines.  I used red line tape to assemble my blocks.  Once assembled,  I covered the blocks completely with gesso to help build a firmer and sturdier surface.  I also "frosted" over the seams lightly with modeling paste and a painters spatula, then I painted and inked the edges.  I used matte Mod Podge to apply the paper, and I also put a heavy coat of the Mod Podge on top of the paper.   My end result were blocks that are very solid and sturdy like wood!

I chose digital papers in a colorful bird theme from Ephemera's Vintage Garden to cover my blocks.  I love the vivid images of birds and nests!  For the feet, I glued wooden spools to the bottom of the blocks then painted them with gesso followed by Tim Holtz dabber paint in copper.  I toned that color down with Gilder's Paste in Verdigris and in Patina.  I also rubbed on some extra gesso to further distress the feet.


  Following the prep work, I had a lot of fun decorating my blocks with  3-D birds, nests and eggs from the floral dept. at JoAnn's to complement the images on the design papers.   I felt that I needed some greenery so I die cut vines and ferns, and then I coiled some green wire by wrapping it around the handle of a large artist's brush and attaching it to the bottom of my bird nests on both blocks.  To the top of the coils I added eggs on the large block and the letters "FLY" on the smaller set.


Gina's Designs Products Used:

Other:
Design Paper by Ephemera's Vintage Garden -  Spring Chic Collection
Vine Die by Marianne Creatables
Fern and Leaf Die by Marianne Creatables
Leopard Butterfly by Renea Bouquets


Sunday, July 6, 2014

Book Box and Card Set for Ephemera's Vintage Garden

Hi Crafty Friends!  Today I am sharing my latest Creative Team  project for Ephemera's Vintage Garden. For this rotation, I am fortunate to be working with The Vintage Queen Bee Kit.  The images in this digital kit are amazing!!  If you enjoy making handmade journals and mini albums, then these complete kits are for you. For my first project with this kit, I chose to alter a wooden book box from Michaels and to store some handmade cards, created from the kit, inside the box.  I know I've said it before, but I can't say it enough how I've enjoyed working with digital papers.  Not only are they gorgeous, but you can print them over and over again, and even resize them to suit your needs.  In this case, I can give these cards to special friends, and just make more so I will always have cards to match my book box!


Below is a better view of the book box.  All paper is from the digital kit which comes with the papers and all sorts of extra images you can cut out to create little pockets, belly bands, circles, tags, etc.  The spine of the book box is also paper from the kit, with just a wee bit of extra distressing added by me. The roses are even created from the printed papers and using a rose die.  The knob and bookplate on the front of the box are by Recollections.   The chipboard flourishes on top of the box are by Gina's Designs.


Below is a closeup of the top of the book box.


Below is the inside of the book box.  Isn't the paper GORGEOUS!


Below are the three cards I created to fit inside the box  More info under each card.
Background design paper from the kit,  as are the pop-dotted elements at lower left (circle and ticket).  Honeycomb at upper right is a Tim Holtz die, chipboard bees on top of honeycomb are Gina's Designs.

On the card Above, all paper is part of the kit.  I only added bits of lace, buttons and a flower, and some Tim Holtz distress ink.

On the card above, all paper is from the kit including the circle shapes at mid and upper left.  In the center I have created a cut-out and tucked in a piece of chipboard honeycomb as well as a couple of bees and crowns by Gina's Designs.

Products Links:

If you would like to see a tutorial on how this paper kit can be made into a completed journal, all ready for your personal touch, you can watch a video by Debbie-Anne the creator of this lovely kit HERE.

Check out Debbie's other gorgeous papers, and sign up for some amazing freebies HERE


Monday, June 30, 2014

Vintage Seamstress - Sewing Themed Altered Cigar Box

Hi everyone! Today I am sharing an altered cigar box using papers from digital files that I have printed myself.  This coming August,  the Gina's Designs team will be participating in a cross promotional using digital designs by Kitty's Scrap Post.  We were excited to find out that in addition to each of us picking our choice of a digital  kit to work with for our August projects, all of us received the French Seamstress Kit as an extra bonus.   When I saw this gorgeous French Seamstress kit,  I just knew I had to combine the papers with Gina's sewing themed chipboard shapes.  A match made in Crafty Heaven!

 I'd been wanting a box to store my vintage Czech glass button collection and other sewing related collectibles I have accumulated, so I dug out this cigar box from my stash, and went to work.  I'm so happy with the way it turned out.  The box measures 7" x 7.5" x 4" deep.

I began by covering the box both inside and out, even the bottom got papered.  The best thing about digital papers is that you can print them as many times as you want to.  Just look how pretty the images are in this collection!

After the box was papered, everything got two coats of matte Mod Podge so the box can be wiped clean with a wet cloth.  Several techniques (as described below each photo) were used to decorate the chipboard shapes.


The dressform on the top of the box was embossed with Stampendous Shabby Pink Embossing Powder.  Closeup view of the top below:

Aren't the papers gorgeous!  In addition to the dressform, I simply added a few Recollections flowers and fabric leaves.

On the front of the box I added more chipboard shapes and a few buttons to blend in with the button print on the paper.  Here the chippies were painted with Folk art acrylics.  Metal bookplate by Recollections and metal feet by Tim Holtz were painted with gesso and green acrylic paint.

On this side of the box I added the button border from Gina's Designs, and embossed it with Stampendous Shabby White, Pink, and Blue alternately.

On this side, I added a skeleton clock and clock hands embossed with Stampendous Shabby White embossing powder.  The chipboard clock mimics the clock and clock hands design on the paper.

On this side, I added scissors and another dressform.  The dressform is embossed with Shabby Blue, and the scissors with Shabby Marine (handles) and with a brass color embossing powder for the blades.

Here's a view of the inside! I'm all ready to add my collection of buttons and things!


Closeup of the inside lid.  On these shapes,  I have painted first with Gesso, stamped with a script stamp and then inked with pale pink and pale blue inks from Recollections new Vintage Romance collection of products.

Inside of the box at the bottom is another gorgeous design from the kit.  It was so hard to decide which paper to use on the top!

I hope you like my project, and be sure to visit us at Gina's Designs, and also check out all the gorgeous digital paper collections at Kitty's Scrap Post.

Gina's Designs Products Used:


Other:
Digital Design Papers by Kitty's Scrap Post


Wednesday, May 28, 2014

Deco Front Shadowbox with Graphic 45 Botanical Tea

Hi everyone!  Here is a fun and easy project to assemble and decorate.  The frame is beautifully ornate and I thought the Graphic 45 Botanical Tea collection really suited the Victorian feel that I envisioned.  There are many ways you could decorate this, and in many themes, FUN!


Wednesday, May 21, 2014

Altered Shadowbox Frame in a Steampunk Style

Hi Everyone!  Today I'm sharing an altered shadowbox frame that began as a thrift store find.  The frame was solid wood and painted black,  and there was glass inside.  I removed the glass and the backing and the fun began!


 I left the black paint alone and painted a thin coat of metallic brass over it.  Since the outside of the frame measured 12 x 12, I thought it would be fun to lay one of our texture sheets (in this case the gears style) over the entire frame.  I simply cut out the center, used matte Mod Podge to adhere the texture sheet to the frame, and then painted it with white gesso.  The rest was just spraying some various colors of ink sprays until I got the look I wanted.  

I painted the butterfly of gears with Folk Art acrylics and added some dimensional pearls.  The stacked hot air balloon was painted lightly with gesso, stamped with script and embossed.  The waterworks frame was embossed in copper.  The steampunk lady was embossed with script, edges inked with Prima chalk inks, and the gears with various metal colored embossing powders.  The rolled roses were created with a die and papers from my scraps.  The background paper is by Mambi, and I added some sprays, yellow gelatos, and a little texture paste and stenciling.  Thanks for looking!


Tuesday, May 20, 2014

Altered Birdhouse for Ephemera's Vintage Garden

I really enjoyed altering this unfinished birdhouse I purchased at Michael's.  It's so exciting to watch the transformation.  This is a Creative Team Project for Ephemera's Vintage Garden, and my second project using the Spring Chic Digital Paper Pack.  These papers are just gorgeous, and the images so clear and bright!


Print these digital papers as many times as you need to complete your project, and even to create matching home decor projects.  The papers are designed to make creating handmade journals easy, but you can use them in any other application, just as you would any other design paper.  I like to create my own flowers to coordinate with my project by printing the design on two sides.  I run the paper through my printer on one side then flip it over and run it through again with one of the other designs on the other side so you get a mix of colors when you create your flowers.   Head on over to Ephemera's Vintage Garden, to check out the gorgeous papers, and sign up for some amazing freebies HERE

Design paper by:

Other supplies used were various flowers from my stash, a Prima nest, a dragonfly by Renea Bouquets, and the trim at the bottom is laser cut chipboard from Gina's Designs.

Thanks for looking!