Showing posts with label wall art. Show all posts

Friday, December 5, 2014

Whimsical Shadowbox for Ephemera's Vintage Garden

Hello my friends!  Today I'm sharing my second project featuring art journal backgrounds and whimsical page elements from "A Happy Place" by Ephemera's Vintage Garden.  I had so much fun creating this!  One of my favorite things to do when crafting is to create a scene.  No, of course I don't mean that I enjoy causing disturbances in public places LOL.  I meant that I like to portray a feeling through the depiction of a particular scene.  It may be a place where I've been in real life, such as I might create with a traditional scrapbook layout, but more often the scene is one where only my imagination could take me.  We all need a touch of whimsy in our lives now and then, and this kit, A Happy Place really makes me smile.


I began with an 8 x 10 wooden shadowbox frame that I purchased from Michaels.  I painted it with several coats of gesso so I would have a bright white surface on the base of the frame.  I wish I could say that I created all of the fabulous mixed media technique on the frame, but I didn't have to, it's already there on the background papers!  I printed the background papers onto tissue paper and then used Mod Podge to adhere it to the frame.  Let it overlap, it's fine, you'll trim and sand it later.  Don't trim it out and sand until it's completely dry, overnight is best.  To print onto tissue paper, I run a glue stick around all four sides of a 65 lb weight sheet of cardstock.  I place the white tissue paper on top pressing it firmly to the glue on the edges, starting at one side and smoothing it firmly over the cardstock backing to prevent as few wrinkles in the tissue paper as possible.  I trim it out so nothing is hanging over the cardstock backing so it doesn't get hung up in the printer and cause a jam.  Most of the time, I can easily remove the tissue paper from the cardstock  backing, but if not, you can just cut the edges off.  When I was finished with the frame, I simply fussy cut all the amazing and whimsical bits from the set, and arranged them inside and around the frame using pop dots for dimension at different levels within my shadowbox.  I added a few things that were not from the printable kit that I will list below.

I always like to remind my followers that many of the digital papers are designed to make incredibly amazing art journals.  The backgrounds look like you spent hours perfecting mixed media techniques.  Don't stop when you've finished creating your art journal.  You can print the papers again and again to create all kinds of projects!

Digital Design Paper from Ephemera's Vintage Garden

Also Part of The Set are:

*The Blackbird at the lower left corner comes from one of the recent freebies called Merry and Wise

Sign up for Freebies Here and receive them weekly in your email box!

Other items used in this project are chipboard shapes by Gina's Designs including:
Birds on a Wire
Birdhouse
Clock Hands
Bird Nest


Tuesday, July 29, 2014

Wall Decor for Ephemera's Vintage Garden


Hi Crafty friends!  Today I'm sharing my second project using the gorgeous Vintage Queen Bee digital paper kit from Ephemera's Vintage Garden.  This creation features some vintage family photos of my Mom, my Brother, and Myself.  Mom was definitely the quintessential Queen Bee in the family, so I was really excited to receive this paper collection to work with.  The papers are stunning, just look at all those bees, and vintage colors to die for!  To create this wall piece, I chose to combine these lovely papers with a honeycomb shaped display tray from Gina's Designs.  Yes, it's a match made in Crafty Heaven! 

 I always like to say that these kits can be used for many projects and in many ways.  Why not as you can print it again and again, but this kit is also perfectly designed to create a complete journal with everything you need.  I have included a link from the designer of this gorgeous paper that demonstrates just how easy the kit can be put together as a journal, ready to embellish in any way you like.  That video is HERE.


Products used:

Check out Debbie's other gorgeous papers, and sign up for some amazing freebies HERE

Honeycomb Display Tray by Gina's Designs
Butterfly by Renea Bouquets


Key and Crest Wall Hanging for Gina's Designs

Hi Everyone!  Today I am sharing a vintage heritage project.  I thought these photos of my Dad and my Granddad, would be perfect to display on our new Key and Crest Wall hanging.  This is a good sized piece to work with, about 12 inches across.  I am really happy with how it turned out, and it's a keepsake since my Dad and Granddad are no longer with us.


 I used several products to get the look I wanted for the key and crest, meaning the scrolled areas and the key.   The center area was papered with the DCWV Timeless Type Stack.    I began by using a fan shaped brush to achieve a light dry coat of gesso (at that point some raw chipboard still shows through).  Next I covered the whole piece with a bright turquoise luminescent type paint.  Following that I dry brushed a bit of bright orange here and there.   Next I embossed over everything with Tim Holtz vintage photo distress embossing powder.  Following that step I stamped over the whole piece with a burlap textured stamp,  and embossed those areas with copper colored embossing powder.  I then rubbed Gold colored Gilder's Paste all along the edges.  Thanks for looking!


Gina's Designs Products Used:


Tuesday, July 22, 2014

12 x 12 Layout in a Shadowbox Frame

Today I'm sharing a project that is personal to me.   The main photo is me as a little girl, with Mom in the oval frame.  I'm calling this piece "The Dressmaker's Daughter".  When I was young, my Mom made all of my dresses and I used to model them in fashion show competitions.  I really enjoyed it, and I continued modeling on department store runways well into my 20's.  

This project began as an unfinished shadowbox frame I purchased at Michael's.  I painted the frame with gesso,  then I did some stenciling with modeling paste, some stamping and some spraying until I got the look I wanted.  The papers I used on the layout are from the French Seamstress Kit at Kitty's Scrap Post.  I really love this digital paper kit and this is my second project using it.  I also did some fussy cutting of elements from the kit like spools, thimbles, birdcage, flowers, etc, and of course you'll find plenty of Gina's chippies on it too.  The shadowbox is fairly deep so I added measuring tape and some wooden spools to the inside.   Thanks for looking!


Gina's Design Products Used:


Design paper by Kitty's Scrap Post - The French Seamstress Kit
Latex roses in two tone blue on upper right of layout by Craftsupplies1
Lace Appliques by Cathy's Crazy by Design on Etsy

Wednesday, May 14, 2014

Bird House Wall Hanging

Today I am here with a really fun to decorate wall hanging by Gina's Designs.   These birdhouses can be embellished in any theme you like.   I really love anything with a nature theme,  so I ended up creating a project with a natural outdoorsy feel.  I hope you like it!


I also incorporated one of the newest pieces from the store, the birds on key wall art, to add something special to my project.  The birds on key is also available in a set of smaller sizes.  Everything is attached with a long 2 inch wide strip of burlap.


Other:


Kaisercraft Limelight Collection papers and diecuts

Friday, April 11, 2014

Wall Art - DT Project Ephemera's Vintage Graden

This Altered Wall Art piece is a Design Team project for Ephemera's Vintage Garden.  I began with a 12 x 12 unfinished frame from Michael's, and some collage style digital papers from the Shabby Chic Mashup paper add-on.  It's a set of 8 printable double-sided pages designed for 4 x 6 mini journals.  They are a "mashup" of several other designs in Debbie's current digital minis line, and were designed to coordinate with other collections.  It just so happens that 6 of these pages will fit perfectly in a 12 x 12 frame.  I love that there is plenty of space around the frame to decorate as I didn't want to take too much away from the designs, the papers are so pretty.  

Once I had the frame finished with stenciling, stamping and misting, I used Mod Podge to adhere the papers to the back of the frame.  I then framed each "section" with a tiny lace trim, giving almost a shadowbox effect.  I decorated the sections with bits of this 'n that, mostly whatever was handy and fit with the theme.  I layered my embellishments for dimension, further adding to a shadowbox effect.
  
Working with digital papers is amazing because you can print them out as many times as you'd like.  It's a great opportunity to have matching projects to decorate your space with.  I will be covering a jewelry box next.  If you scroll down to the labels section at the right margin you can find my other projeects I have made with this same collection.  Head over to Ephemera's Vintage Garden, to check out the gorgeous papers, and sign up for some amazing freebies HERE


Other Products Used:
Diamond patterned texture sheet on the frame, small dressform, and doily by Gina's Designs
Butterflies by Renea Bouquests on Etsy
Most embellishment die cuts by Kaisercraft, Prima, and Creative Imaginations


Tuesday, March 25, 2014

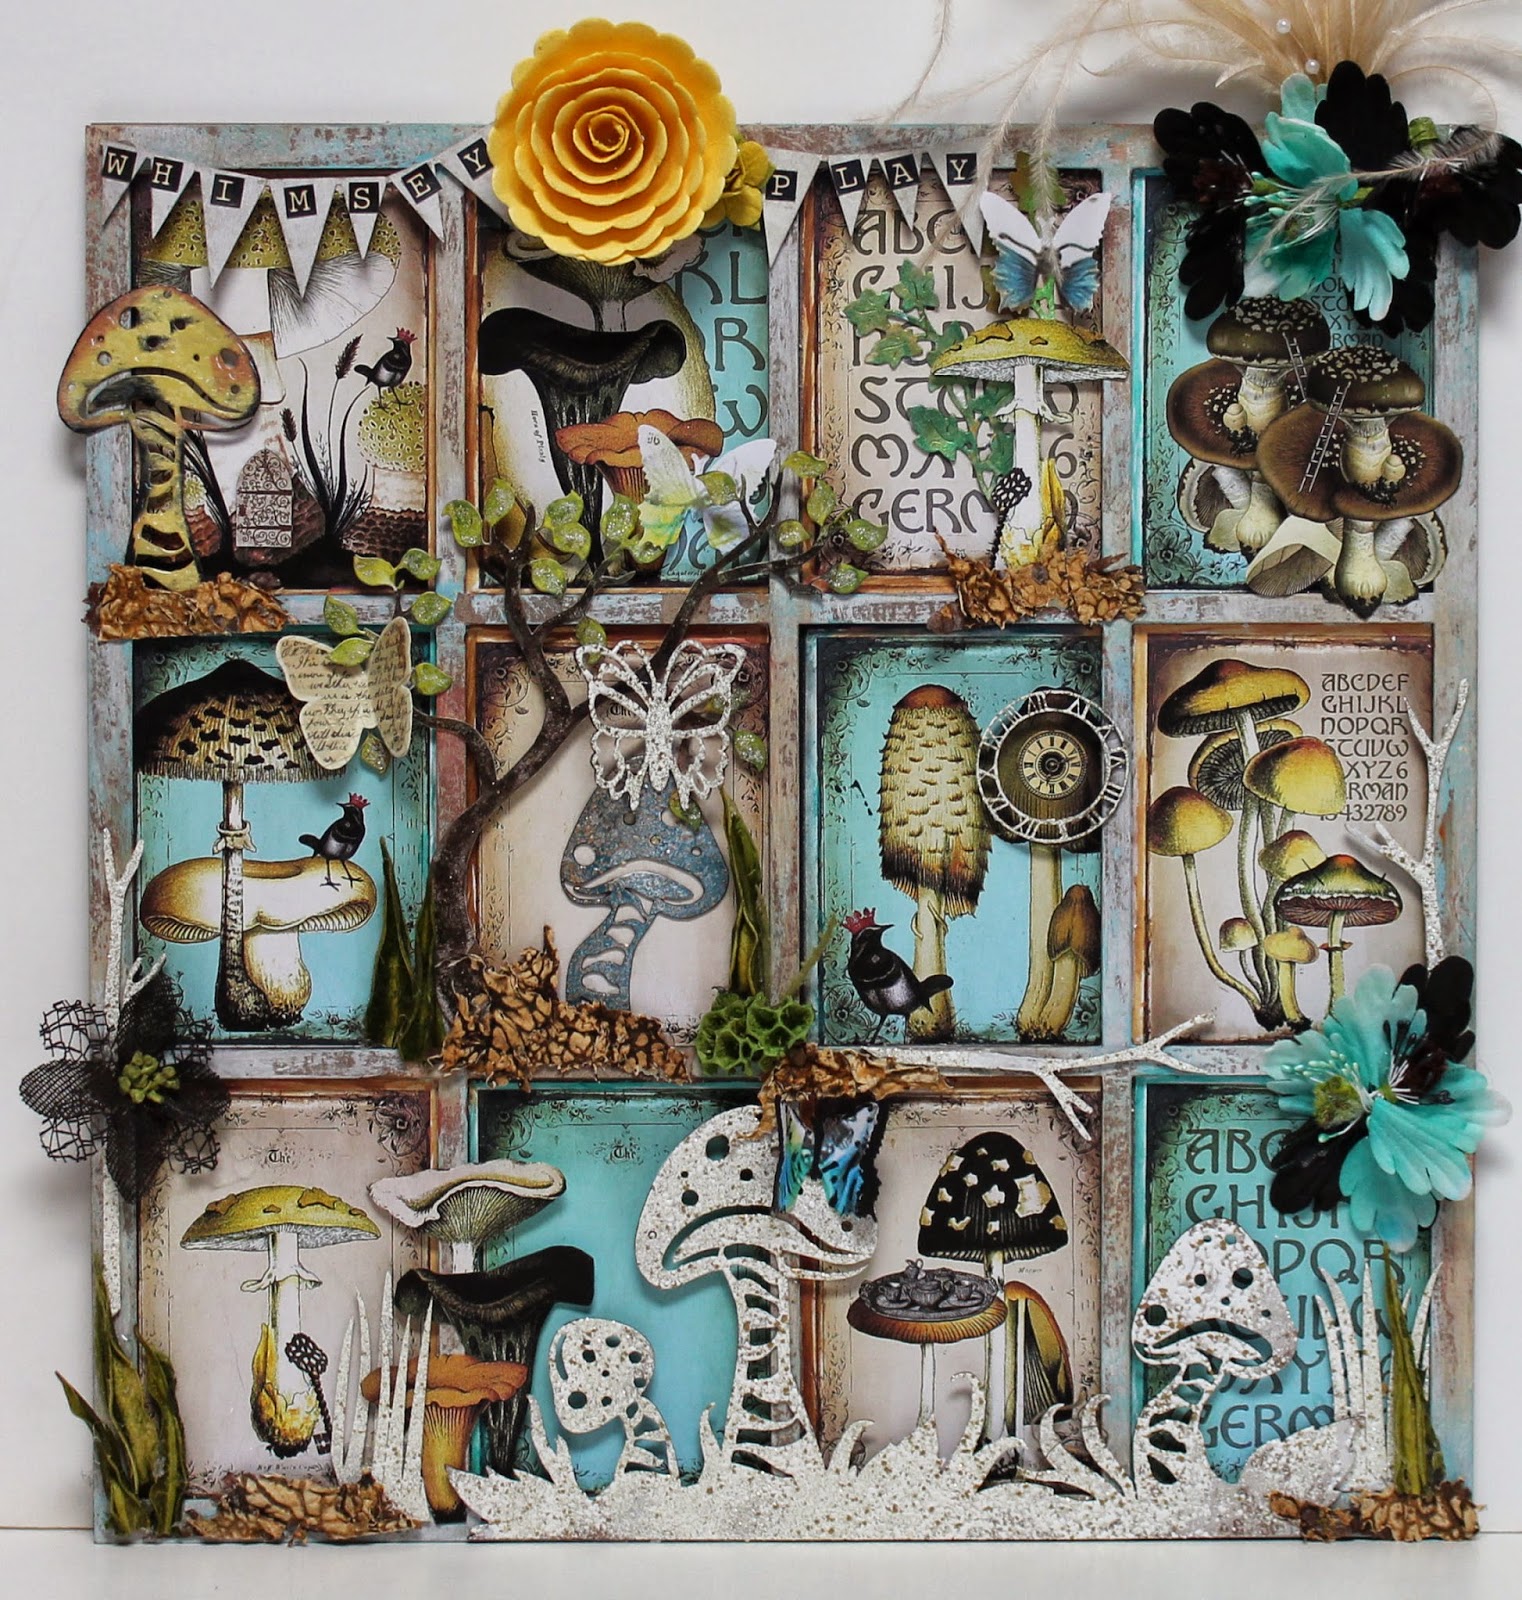
Whimsical Mushrooms ATC Display Tray

Hi everyone!  Today I'm sharing this ATC Display Tray by Gina's Designs.  I love all things nature inspired, and when I can add more than a touch of whimsy to the project, then that's all the better!  When Gina designed these chipboard mushroom shapes, I knew I needed to have them.  I had lots of ideas on where I'd use them, and when I came upon this amazing mushroom paper by Ephemera's Vintage Garden, perfectly sized for ATC's, I knew it would be a match made in Whimsy Heaven.  Naturally, this Display Tray is a perfect way to display your ATC's, but I had fun embellishing all the little squares, and creating a different adventure in each one.   Thanks for looking!

Gina's Designs Products Used:

Sticks and branches from various pieces

Other:
Prima Flowers
Stampendous shabby embossing powders
Various dried items and feathers from my stash


Sunday, January 12, 2014

XO XO Wall Hanging in celebration of Valentine's Day

Today I am sharing another project for our January cross promotional with the Robin's Nest. The new Valentine themed products from Gina's Designs have made working with this paper so much fun.  The new designs are available in the store just in time for your February projects.  It was hard to decide which one to use, but here you see the XO XO Wall Hanging which includes the chipboard backing, the heart shaped frame, and the XO XO letters.  To begin, I backed the piece with striped paper from The Robin's Nest, and covered the letters with their glittered red paper.  I painted the heart frame in baby pink, and used some extra high foam mounting squares to pop it up from the back to create a shadowbox effect.  I embellished with some vintage Valentine images from my stash (which were also given dimension with pop dots), followed by flowers, bling, and other things, and of course our awesome chipboard cupid, part of  the new Cupid Shape Set.

The cupid was covered lightly with white gesso, followed by a coat of white chalk ink , then stamped in red with a script stamp, and finally by inking the edges lightly in red.


Gina's Designs Products used:

Robin's Nest Products used:
From the Wild About U paper collection:
Classic Roses
Red Glitter Paisley
Glittered Letters

Other Products:
Folk Art paint in Baby Pink
Versa Magic Chalk Ink in Cloud White
Hero Arts script stamp
Inkadinkadoo dye-based ink in red
Versa Magic Chalk Ink in Red Magic
Lace by Tresor Deluxe
Crocheted bows by Delightful Designer on Etsy
Scripted flowers by Petaloo
Butterfly by Prima
Red flower and flat-backed pearls by Recollections
Pink lips ribbon from Smart Cindy on Etsy
Vintage Valentine images and red polka dot ribbon from my stash

Monday, December 16, 2013

Home Decor or Photo Display Tray

Today I'm sharing one of our Photo Display Trays which I've used as a Christmas home decor project.  This project could be hung on my wall as part of my Holiday display, or perhaps placed on an easel on my mantel.  These display trays come in a variety of designs and themes, from Steampunk to pets and children. This is the fourth one I've made!  I love how simple they are to decorate, with or without photos.


In addition to the tray itself, which I painted in cardinal red, I also added some Gina's Designs chipboard shapes to my tray.  Closeups are below explaining how I colored and decorated the ornament and the snowman:


For the snowman:

If you're after a vintage look, as I was, try inking instead of painting.  First dry brush the pieces with a thick gesso and a fan shaped brush, using very little paint on the brush.  You can always add more.  On mine you can see the natural chipboard peeking through.  I didn't want complete coverage, making it look more vintage and shabby.  The fan brush helps achieve a light coverage.  After the gesso was completely dry, I simply colored with Tim Holtz distress inks in Christmas colors using cosmetic sponges to apply the ink.  Note that the hat is naturally highlighted by using more ink at the edges.  I really like the effect.  I wanted my snowman to wear a vest, so I used the holly leaf shapes from the shape set to make a vest :)

For the ornament:


This was really simple to decorate with embossing powder.  No need to paint the chipboard if your embossing ink is nice and wet.  I used Stampendous shabby embossing powder in white.  The shabby embossing powders are multi-colored, and this one has flecks of gold in it so it's a nice one-step process.  After the embossing, I applied Tim Holtz frosted film.  Simply cut a piece from the roll that's big enough to cover your ornament.  Trace the circle, then cut the film just inside your trace line.  Apply the film to the back of your ornament.  The sticky side will be up.  Shake some clear glass microbeads all over the sticky area. Tap the ornament to remove excess beads onto a piece of paper so you can return the excess beads to your container.  Add some bling gems.  For a sturdier ornament to hang on the tree, you could also back these with plain paper, painted chipboard, or design paper, and/or sandwich the frosted film in between.  Fun!

Gina's Designs Products used:

Ornaments Shape Set (not available online, at brick and mortar stores only)

Other Products Used:

Folk Art paint in Cardinal Red
Gesso
Fan Brush
Tim Holtz Distress Ink in Black Soot, Iced Spruce, Pine Needle, and Festive Berries
Recollections bling and the little Christmas packages also by Recollections
Tim Holtz tattered poinsettia die
Design paper by My Mind's Eye (All is Bright collection)
Tim Holtz movers and shapers die (mini reindeer and 25 set) - ( I used the 25 at the bottom left of the tray)


Thursday, August 22, 2013

Flying Heart Wall Hanging Kit

This is one of the wall hanging kits from Gina's Designs and it was a pleasure to assemble and decorate.

The kit comes with the following:

6 x 6 chipboard square with a small hole punched in each corner (I used my cropodile to insert eyelets into each hole).  This square piece is intended to be at the top

6 x 7.5 chipboard rectangle with two holes punched at the top and one hole punched in the center of the bottom.  This piece is intended to connect to the square at the top, and to hang the large key from the center of the bottom.

A large heart and a smaller heart
A pair of wings
A crown
Large key (to hang from the bottom of the chipboard rectangle) and also a smaller key
Corrugated die cut shape (I used this on the top piece)
Corrugated cardboard strip (fits the length of the bottom piece, and I chose to cut mine in half)
Three words (Dream, Inspire, and Create)

Please see the bottom of this post for a list of the other items from Gina's Designs that I added to my hanging.  This piece looked gorgeous as it was without the extras I added, but that's just me, I can't stop once I get my hands on my chippies :)


Gina's Designs Products used:
Flying Heart Wall Hanging Kit
Steampunk Shapes Set
Steampunk Shapes 2
Hinge straps shapes set
Brick Wall

Other Products used:

Butterflies from Renea Bouquets on Etsy
Tim Holtz Design paper
Prima Chalk Inks
Crackle Accents
UTEE
Metal Effects Iron Paint by Modern Masters (used on the chipboard keys and hinge)
Metal Effects Rust Activator by Modern Masters (The activator is part two in the above process)
Rub n Buff in silver, in gold and in patina
Tim Holtz silver metallic distress dabber paint
Tim Holtz distress embossing powder (on the wings)
Metal roses from my stash
Recollections gold roses
Magic Mesh in pale green
Tim Holtz chain clasps


Thursday, July 11, 2013

Bird House Shelf

This birdhouse shelf is so much fun to decorate.   It's meant to be a wall shelf, but since I have a thing for "feet", and I don't have a lot of wall space left,  I decided to use the Tim Holtz feet instead of hanging my birdhouse on the wall.  Either way, it would be great.  I can think of other ways to display this as well.  I was originally thinking of attaching the entire house to an 8 x 10 wooden plaque that I bought at the dollar store.  I'm sure I'll want to play with at least one more of these.

Since we are featuring the lovely feathers this week, I've used them as well on this project.  They are so "feathery" they pick up color really well.


I began by painting my bird house with gesso, followed by two shades of teal in folk art paints.  On top of that I applied Kroma Crackle and various shades of Prima chalk inks.  The Tim Holtz feet were distressed using rub n buff in white and patina.  I used the smallest sized intricate doilies in the windows and the vine frame which I cut apart to use as ivy over the doorways and windows.  After coloring the vines with gesso, then Prima chalk ink,  I applied glossy accents.  The roof was covered in script paper.  The entire house was coated with Tim Holtz Distress rock candy crackle paint.  The feathers were painted with magical mica's in various shades, mostly gold.

Gina's Designs Products Used:

Friday, June 21, 2013

Photo Display tray "The Cat's Meow"

Today I have one of the Gina's Design's Photo Display Trays which currently are available in six styles.  This one is called the "Cat's Meow".   This was so much fun to create using one of my kitties "Timothy" as my inspiration along with shapes from our Nancy's Garden collection, and other favorite pieces from Gina's Designs.  These Photo Display Trays are made of sturdy wood, and are so versatile and easy to work with.  In this project my pieces were mostly colored with Prima Chalk Inks.  In some cases I've embossed with either clear UTEE, or Stampendous crystal embossing powder.


Above is the finished piece


Here I used one of our intricate border sticks, an ornamental bird cage, and the small leafy tree which I cut up into pieces.


Some of the grids come with overlay pieces.  Here the word "meow", and two of the skeleton fish are overlays.

I framed this section with one of our ivy corners

The word "love" is also from Gina's Designs, from the 10 word package.  You can also see another view of the lace border stick and pieces from the leafy tree.


I've framed this section with the smallest sized palm tree.


Gina's Designs Products used:

Photo Display Tray - Cat's Meow (please also see the other styles)
10 words package


Monday, February 11, 2013

Steampunk Photo Grid

This is one of the new lazer cut wooden photo grids available at Gina's Designs.  This is the steampunk cog framed design.  There are other designs available including a lace frame, a damask frame, dog themed and cat themed frames to name a few.  The frames are approx eleven inches in diameter and ready for you to paint, paper, and decorate.  Many other chipboard shapes from Gina's Designs were also used in creating this piece.


 The frame was painted with black acrylics, then covered with glass bead gel, then I rubbed it with silver rub 'n buff
 The peacock feather is also from Gina's Designs and was painted with Lumiere acrylic paints and I also used stickles .  All gears shapes are also from Gina's Designs and were painted with Lumiere acrylic paints and/or embossed with clear UTEE, or Stampendous frantage shabby embossing powers.
 Flowers by Petaloo canterbury collections.  background paper by DCWV The Timeless Type Stack, images by Graphic 45 Steampunk Debutante.
 Hot air balloon by Gina's Designs, inspire acrylic lightbulb by Prima Junkyard Findings.  Butterfly by Reneabouquets.

 Pocketwatch pieces also by Gina's Designs.