Showing posts with label ephemera's vintage garden. Show all posts

Friday, April 10, 2015

Altered Printer's Tray for Ephemera's Vintage Garden

Hello friends!  Today I'm sharing my first project using journal bits and backgrounds from the Mabel's Diary digital collection for art journaling available at Ephemera's Vintage Garden.  In addition to bits from the collection, I've also incorporated some of the fun freebies issued weekly.  I purchased the tray at Michael's, painted it white, then covered it with various colors and patterns of washi tapes.  I cut my images from the collage sheets, and played with the arrangement until I liked it.  Easy peasy and fun!  
Also Available:
Mabel's Diary Printable Journal Kit
Other:
The miniature chipboard corset is by Gina's Designs

Also visit the designer of all of the amazing digital collections on the YouTube channel, where you can watch the gorgeous art bits come together in the most amazing art journals!  So inspiring!

Sign up for your weekly freebies right HERE, delivered right to your email, or visit us on Facebook.

Thanks for looking and come back soon to see more projects!

Monday, December 29, 2014

A Four Card Set for Ephemera's Vintage Garden

Here is my third project using "A Happy Place".  I had so much fun creating these whimsical cards for Ephemera's Vintage Garden.  The images and backgrounds were designed to create a beautiful art journal that anyone can easily create just by cutting out all the bits and borders and mixed media background papers that look like you spent hours creating. I was drawn to this set the moment I saw it, but I thought it would be fun to take these amazing images out of my journal and onto my desk (in my first project using this kit) and onto my wall (in my second project using this kit) and finally in my third project onto some note cards that I can share with others to brighten someones day.  I created these cards quickly and easily.  I like to print out my papers then cut out the images while relaxing in front of the TV in the evening.  Once the images are cut out, the fun truly begins when you start arranging.  I hope you like them!  For other projects I created with these papers,  please see the labels section at the right sidebar here on my blog under Ephemera's Vintage Garden.


Digital Design Paper from Ephemera's Vintage Garden


Also Part of The Set:

Do you love what you see!?? Sign up HERE for freebies emailed to you weekly.

Other:

Laser cut cardstock doilies by Gina's Designs


Friday, December 5, 2014

Whimsical Shadowbox for Ephemera's Vintage Garden

Hello my friends!  Today I'm sharing my second project featuring art journal backgrounds and whimsical page elements from "A Happy Place" by Ephemera's Vintage Garden.  I had so much fun creating this!  One of my favorite things to do when crafting is to create a scene.  No, of course I don't mean that I enjoy causing disturbances in public places LOL.  I meant that I like to portray a feeling through the depiction of a particular scene.  It may be a place where I've been in real life, such as I might create with a traditional scrapbook layout, but more often the scene is one where only my imagination could take me.  We all need a touch of whimsy in our lives now and then, and this kit, A Happy Place really makes me smile.


I began with an 8 x 10 wooden shadowbox frame that I purchased from Michaels.  I painted it with several coats of gesso so I would have a bright white surface on the base of the frame.  I wish I could say that I created all of the fabulous mixed media technique on the frame, but I didn't have to, it's already there on the background papers!  I printed the background papers onto tissue paper and then used Mod Podge to adhere it to the frame.  Let it overlap, it's fine, you'll trim and sand it later.  Don't trim it out and sand until it's completely dry, overnight is best.  To print onto tissue paper, I run a glue stick around all four sides of a 65 lb weight sheet of cardstock.  I place the white tissue paper on top pressing it firmly to the glue on the edges, starting at one side and smoothing it firmly over the cardstock backing to prevent as few wrinkles in the tissue paper as possible.  I trim it out so nothing is hanging over the cardstock backing so it doesn't get hung up in the printer and cause a jam.  Most of the time, I can easily remove the tissue paper from the cardstock  backing, but if not, you can just cut the edges off.  When I was finished with the frame, I simply fussy cut all the amazing and whimsical bits from the set, and arranged them inside and around the frame using pop dots for dimension at different levels within my shadowbox.  I added a few things that were not from the printable kit that I will list below.

I always like to remind my followers that many of the digital papers are designed to make incredibly amazing art journals.  The backgrounds look like you spent hours perfecting mixed media techniques.  Don't stop when you've finished creating your art journal.  You can print the papers again and again to create all kinds of projects!

Digital Design Paper from Ephemera's Vintage Garden

Also Part of The Set are:

*The Blackbird at the lower left corner comes from one of the recent freebies called Merry and Wise

Sign up for Freebies Here and receive them weekly in your email box!

Other items used in this project are chipboard shapes by Gina's Designs including:
Birds on a Wire
Birdhouse
Clock Hands
Bird Nest


Saturday, November 22, 2014

Whimsical Altered Box for Ephemera's Vintage Garden

Today I'm sharing a really fun box I created for Ephemera's Vintage Garden.  I used images and background papers from a set of digital printable art journal elements called A Happy Place.  I wanted to create something with a mixed media look and feel and with a touch of whimsey.  The papers themselves have paint splatters and blotches and I also added some of my own splatters and drips here and there, and some gesso to give it a real artsy look.  The papers and journal bits are designed to make creating an art journal both fun and easy, but there are so many other fun creations you can make in addition to your art journal.  I will be showing you more fun projects using this set next month.


Everything is very sturdy and coated with plenty of Mod Podge for durability so I can use this box for art supplies.  The flower on top is made of wood that I covered with more of the papers.  There are also more pieces, of both backgrounds and art bits available in this set which I will link to below.

Products:

Other parts of this set that are available:

Other Products Used:
Unfinished wooden cigar box from JoAnn's
Wooden Flower from Factory Direct Craft available online
Chipboard diamond texture sheet from Gina's Designs


Thursday, October 23, 2014

Steampunk Canvas for Gina's Designs


Today I'm sharing an altered inverted 8 x 10 canvas that I created in a fun Steampunk style.  The adorable image and the papers behind it were digital freebies from Ephemera's Vintage Garden.  I thought that the Steampunk chipboard shapes from Gina's Designs really complimented this image.  I used the techniques described below on the chipboard shapes.


The butterfly, the hot air balloon, and the gears corner at bottom right were first given a light coat of gesso.  I always use a light touch with the gesso, usually just a dry brushing with a fan brush,  because I like the natural shading it provides when some of the natural chip color is coming through.  I then used a variety of different colored gelatos on the butterfly.  I blended the colors with a touch of water then let it dry.  To get the distressed and grungy look I was after, I sanded it back so some gesso showed through.  I followed that with a touch of Prima chalk ink in a burnt orange color.  By that point you couldn't even tell that I'd ever used the gelatos, but that's OK because with each layer of color you add, you'll get more depth and dimension as an end result.  I added a bit of stickles here and there, some bead connectors and I coiled some copper wire for antennae.  

On the balloon, I stamped a script stamp with perfect medium, then added shades of perfect pearls.  It has a beautiful sheen to it that doesn't show in the photos.  For the balloon overlay I embossed with copper embossing powder, sanded some of it off, then touched it up with Prima Chalk Ink in burnt orange.  

For the gears, I simply ran it through my Big Shot in a dry embossing folder, then rubbed it with different shades of Gilder's Paste.

For the chipboard Word Ribbon Title of "Explore", I rubbed the raw chipboard with Prima Chalk Ink in the burnt orange shade, added a touch of Tim Holtz tarnished brass Distress Paint then rubbed gesso over the letters.

To add texture to the image itself, I used a grungy edge stamp with shabby white embossing powder to make it look like ocean foam, and then I added some amber frosted flat back pearls.

To create the texture on the frame of the inverted canvas, I began by using matte Mod Podge to apply torn papers in colors to match the project all around the frame covering the staples.  I then dry brushed gesso over the paper using a light touch.  I followed with some Art Anthology dimensional sorbet paint applied through a stencil all over the frame.  I trimmed in some of the blank spaces with Tim Holtz distress paint in tarnished brass to highlight.  I added gel medium and applied glass beads and some little stones (lower left corner)

I made the grungy flower at left with the spikey shapes of the Tim Holtz Tattered floral die (I cut two), and in the center I used a Sizzix daisy die (I cut two), and punched out sun shapes for the center (I punched out three), then I added some glass beads.  The flower at right is just a simple rolled rose by Die-namics.

Thanks for looking!

Gina's Designs Products Used:


Tuesday, October 21, 2014

Shabby Book Box - Creative Team Project for Ephemera's Vintage Garden

Today I'm sharing a super shabby altered book box.  I have created some fun inside the box with the intent that it be displayed upright on my nightstand.  I just love how it came out, and I can't stop looking at the inside.  All of the papers as well as the tags and images inside the box, are part of the printable digital paper kit called Paris in My Heart by Ephemera's Vintage Garden.  Additionally, I have added some lace, doilies, flowers and other embellishments.  Inside I have created a flower from the digital papers and using the Tim Holtz Tattered Flower die.  This is my third project created with this collection.  I love that I can print what I want over and over again.  It is so gorgeous, perfect for any lover of shabby roses.  Thanks so much for looking!


Products Used:

Digital Design Paper by Ephemera's Vintage Garden
Paris in My Heart Collection

Check out Debbie's other gorgeous paper collections, and sign up for amazing weekly freebies HERE!


Other:
Chipboard corner piece on cover by Gina's Designs
Flowers by Petaloo
Prima Resins
Doilies and parchment flower cluster inside cover by Craftsupplies1
Butterflies by Renea Bouquets


Sunday, October 5, 2014

Shabby Chic Memory Tray for Ephemera's Vintage Garden

Hi Crafty Friends!  Today I am sharing a creative team project for Ephemera's Vintage Garden.  This Memory Tray features the digital paper kit called Paris in my Heart.  This is such a perfect gift for a lover of shabby chic Paris style, or I could just keep it all to myself.  What I love about digital paper kits is that I can always just print more paper and make another one.  This is the second project that I've created featuring this paper kit, and I hope you'll come back to see yet another that I plan to create later this month..


I have done some fussy cutting of some of the images in the paper and raised them up onto pop dots to create some extra dimension.  This tray did not take me long at all to decorate. The hardest part was in deciding which gorgeous paper to put in which square :)

I began by painting the tray with white gesso, then I used Tim Holtz tissue tape around the frame, and added some distress ink.  

Products:

Digital Design paper by Ephemera's Vintage Garden
Paris in my Heart printable kit

Wooden memory Tray by Recollections
Doilies and chipboard shapes (including the Eiffel tower) are from Gina's Designs
Tim Holtz tissue tape
Flowers by Prima and Petaloo
Butterflies by Renea Bouquets

Check out Debbie's other gorgeous papers, and sign up for amazing weekly freebies HERE!

Monday, September 8, 2014

Creative Team Project for Ephemera's Vintage Garden and Tim Holtz Folio Folder


Hi Friends!  Today I'm sharing my first project using the latest digital paper kit I received called Paris in my Heart from  Ephemera's Vintage Garden.  I know that each time I receive a new kit I say it's my favorite one yet, but I can't help myself, I get so excited!  I mean, what's not to love about images of Paris combined with beautiful shabby roses?  One of my favorite things about this particular kit is the combination of vintage washed out colors combined with the bright vivid ones.   It's such a feast for the eyes.

Anyway, I was trying to decide what I was going to create when I happened to find one of those Tim Holtz Folio's in my stash.  The small folio (which is not really that small I might add) just so happened to fit these papers perfectly!  I love how the folio cascades showing off the beautiful images so perfectly.  The first thing I did after printing the kit was to look through my files of Ephemera's Vintage Garden Freebies.  It's awesome when you find just the right images that match perfectly, so I printed some of those too, then I just got to work (or more like play).  I love the results, and I'm planning to gift this to a special friend who was practically drooling over it when I was half done. 

There are lots of tags and pockets for tucking, and I'm planning to also tuck an accordion style folder of just the journaling pages at the back of the folio so she will have even more places to write.  The folder leaves plenty of room without getting bulky.


Supplies:

Printable Design Paper by Ephemera's Vintage Garden

Check out Debbie's other gorgeous papers, and sign up for amazing weekly freebies HERE!


Wednesday, August 20, 2014

Creative Team Project for Ephemera's Vintage Garden - Bee Book

Hi Everyone!  Today I'm sharing a project that I absolutely love!  This is my third project using the Vintage Queen Bee 5 x 7 Printable Journal Kit by Ephemera's Vintage Garden.  If you've never worked with digital papers before, I would urge you to try it.  Print it and use like any other design paper, with the advantage of printing your favorite patterns and images over and over again.

I have created this gorgeous book using the envelope mini album tutorial by Kathy Orta on YouTube.  You simply create the book with an envelope and blank card set from Michael's.  The idea is that the folded cards will slip into the envelope ends to create flaps.  I must say that I was very impressed at all the real estate it provides, as the flips and flaps went on for days. 

In some of my photos below you can will see tags and inserts, and in others I have pulled the tags out so you could see the pockets I created.  I didn't follow the tutorial exactly other than the basic construction and the hinge binding system she used.  Mostly I just started creating as I went along, and put flaps and pockets wherever I thought they should go.  I had a piece of distressed corrugated cardboard on my desk and I used that as the spine.

Just look at all the gorgeous bees!!

Also to note, I have used some of Debbie's freebies along with papers from the kits, and I have also used the journaling tags that are an add-on to the kit.  The kit comes with ready to cut out tags and pockets, plenty of everything for a complete journal or mini album, but let's just say I was bee obsessed.


I have also included a link from the designer of this gorgeous paper that demonstrates just how easy the kit can be put together as a journal, ready to embellish in any way you like.  That video is HERE.


Products used:


Check out Debbie's other gorgeous papers, and sign up for some amazing freebies HERE! 


Tuesday, July 29, 2014

Wall Decor for Ephemera's Vintage Garden


Hi Crafty friends!  Today I'm sharing my second project using the gorgeous Vintage Queen Bee digital paper kit from Ephemera's Vintage Garden.  This creation features some vintage family photos of my Mom, my Brother, and Myself.  Mom was definitely the quintessential Queen Bee in the family, so I was really excited to receive this paper collection to work with.  The papers are stunning, just look at all those bees, and vintage colors to die for!  To create this wall piece, I chose to combine these lovely papers with a honeycomb shaped display tray from Gina's Designs.  Yes, it's a match made in Crafty Heaven! 

 I always like to say that these kits can be used for many projects and in many ways.  Why not as you can print it again and again, but this kit is also perfectly designed to create a complete journal with everything you need.  I have included a link from the designer of this gorgeous paper that demonstrates just how easy the kit can be put together as a journal, ready to embellish in any way you like.  That video is HERE.


Products used:

Check out Debbie's other gorgeous papers, and sign up for some amazing freebies HERE! 

Honeycomb Display Tray by Gina's Designs
Butterfly by Renea Bouquets


Tuesday, July 15, 2014

Artist Trading Blocks for Gina's Designs

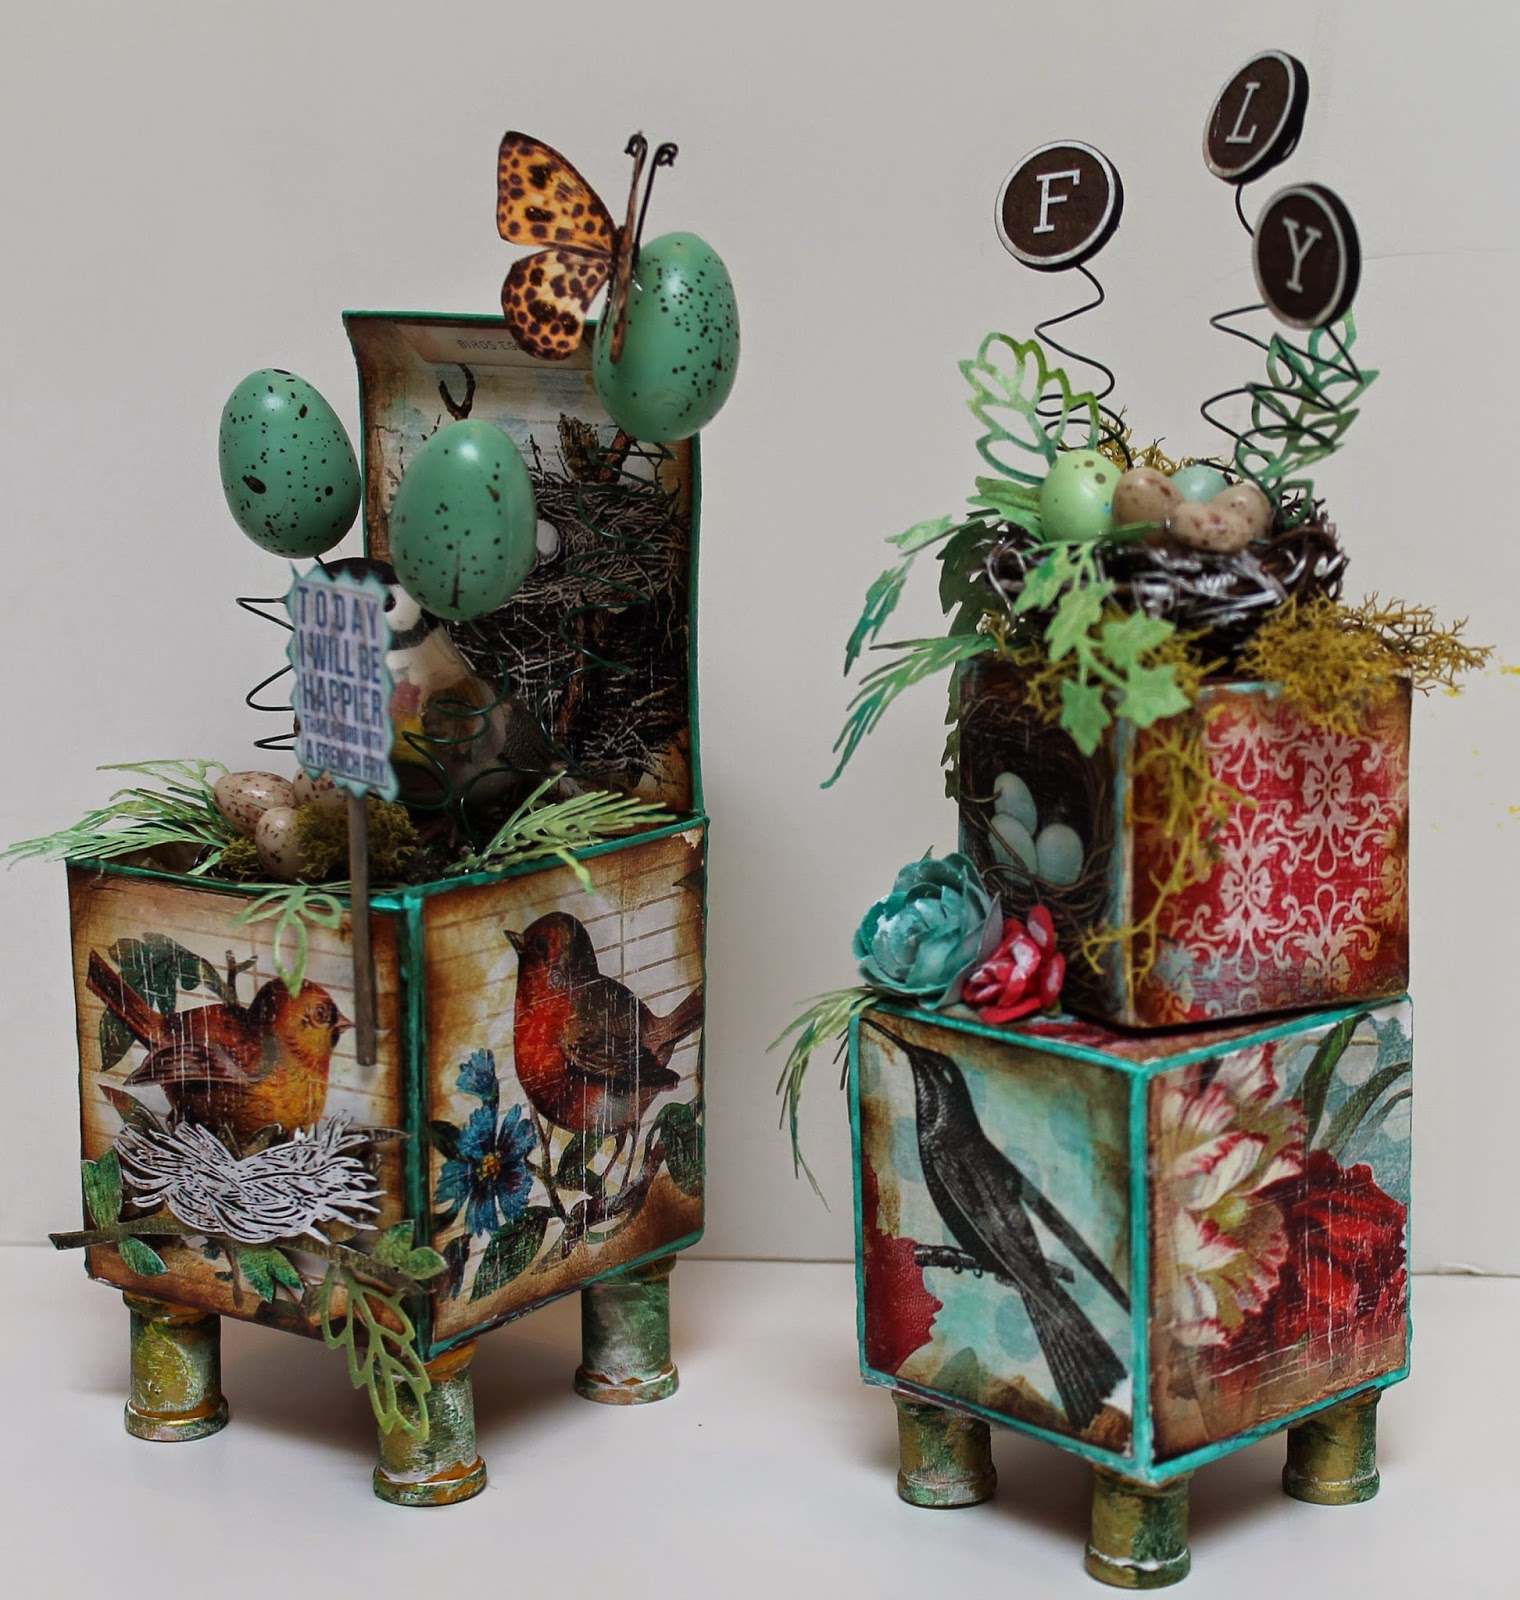
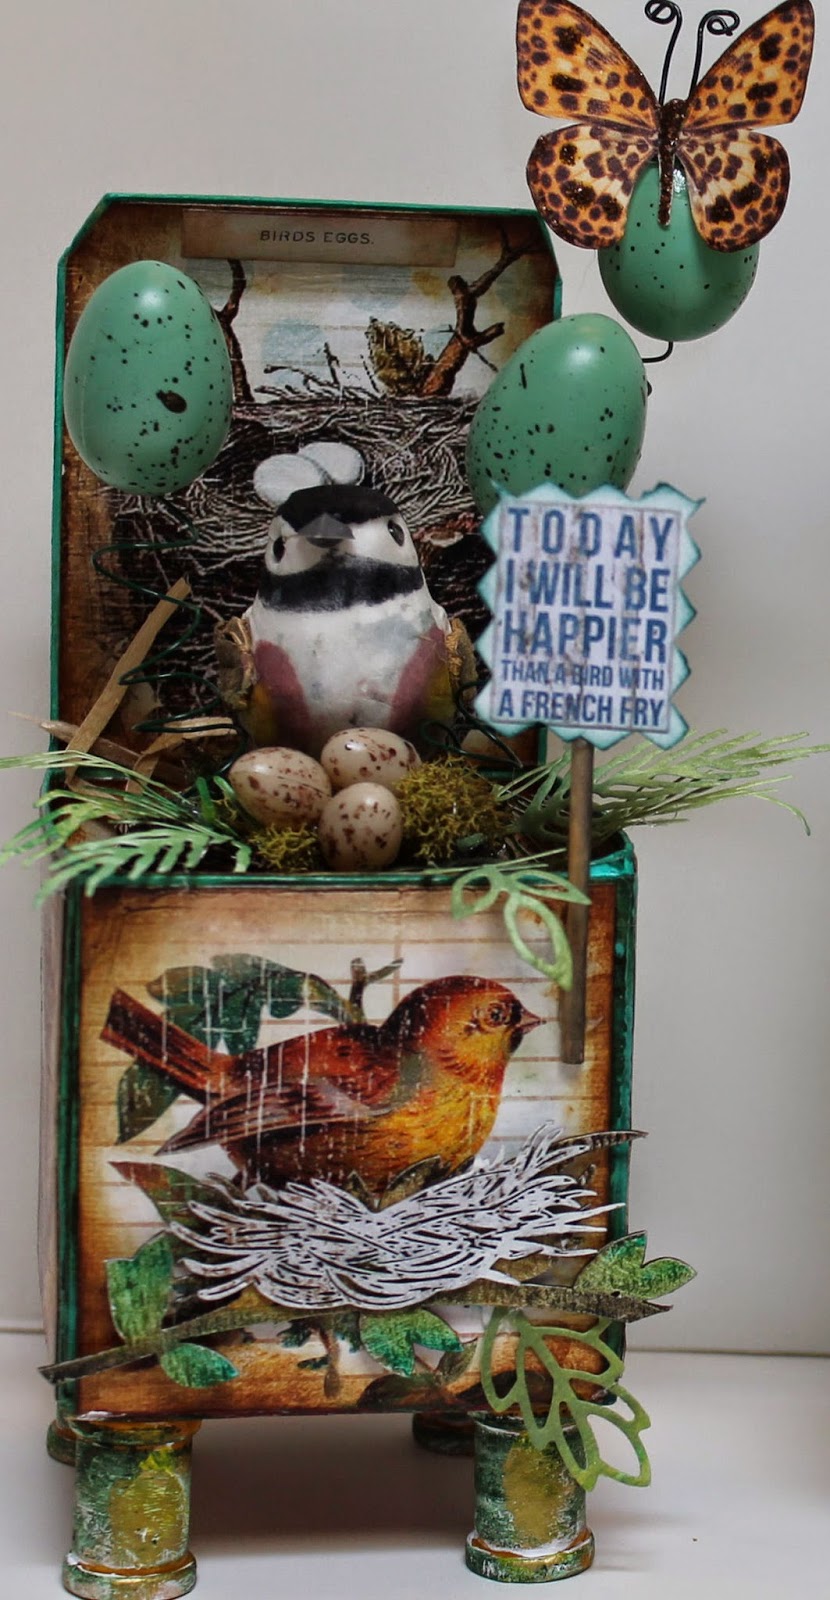
Hello Friends!  The team at Gina's Designs have been sharing these Artist Trading Blocks all this month, and it's been amazing to see all the different versions of these fun and versatile blocks.  I decided on a bird theme for mine.  I used the large block separately and left the top cover open,  and I stacked the smaller ones together.  The blocks are made of chipboard and come ready to assemble using the pre-scored fold lines.  I used red line tape to assemble my blocks.  Once assembled,  I covered the blocks completely with gesso to help build a firmer and sturdier surface.  I also "frosted" over the seams lightly with modeling paste and a painters spatula, then I painted and inked the edges.  I used matte Mod Podge to apply the paper, and I also put a heavy coat of the Mod Podge on top of the paper.   My end result were blocks that are very solid and sturdy like wood!

I chose digital papers in a colorful bird theme from Ephemera's Vintage Garden to cover my blocks.  I love the vivid images of birds and nests!  For the feet, I glued wooden spools to the bottom of the blocks then painted them with gesso followed by Tim Holtz dabber paint in copper.  I toned that color down with Gilder's Paste in Verdigris and in Patina.  I also rubbed on some extra gesso to further distress the feet.


  Following the prep work, I had a lot of fun decorating my blocks with  3-D birds, nests and eggs from the floral dept. at JoAnn's to complement the images on the design papers.   I felt that I needed some greenery so I die cut vines and ferns, and then I coiled some green wire by wrapping it around the handle of a large artist's brush and attaching it to the bottom of my bird nests on both blocks.  To the top of the coils I added eggs on the large block and the letters "FLY" on the smaller set.


Gina's Designs Products Used:

Other:
Design Paper by Ephemera's Vintage Garden -  Spring Chic Collection
Vine Die by Marianne Creatables
Fern and Leaf Die by Marianne Creatables
Leopard Butterfly by Renea Bouquets