Showing posts with label gina's designs. Show all posts

Thursday, November 13, 2014

Vintage Victorian Winter Themed Diorama for Gina's Designs

This Diorama is one of the newer selections in our store, and it's my new favorite piece to work with.  The possibilities are endless for decorating in any theme you like.  This is a large piece at 5" wide, 5"deep and around 7" tall.  When assembled, the Diorama provides a spacious  triangular shaped niche on each of the four sides for you to decorate.  The top of the piece also provides a really large space.   This piece also comes with a lazy susan pedestal to attach to the bottom so it will turn.  I chose not to use the rotating base and opted to add some Tim Holtz feet instead.  I wanted my creation to have a wintery vintage Victorian feel, and I thought that the ornate feet best reflected the look I was after.  


After I assembled the piece, I gave it a light coat of gesso.  I papered the inside of the niches with canvas resist by Prima Finnabair Elementals in a music note pattern.  I needed two sheets and had scraps left over.  I stenciled over the canvas using a snowflake stencil,  first with Prima Chalk Ink in Old Rose, and then I used the same snowflake stencil with sparkle texture paste.  I added some gesso with a dry fan shaped brush here and there to distress. 

I covered the vertical framework of the piece with crackle texture paste, and distressed it with some gesso and a little light pink acrylic paint, and a little buttermilk acrylic paint.  The horizontal framework was covered with a sequined eyelash trim I got on ebay and had been hoarding.

The chipboard shapes were embossed with Stampendous shabby embossing powders in cream and in white.

The Victorian winter images were mostly freebies I found on Pinterest, along with a collage sheet from Gecko Galz called Christmas Icons.

Thanks for looking!

Gina's Designs Products Used:

Diorama (coming soon)

Thursday, November 6, 2014

Magical Fairy Layout for Gina's Designs

Today I am sharing a 12 x 12 layout that I adhered to a flat unfinished particle board frame from Michael's.  The Paisley Frame from Gina's Designs surrounds the 5 x 7 opening in the frame and adds dimension.  I decoupaged the design papers directly onto the wood, some of which I tore and layered.  The paper is applied to the wood with matte Mod Podge, and I have tucked some of our intricate doilies in between the layers for added texture and interest.  One of our Garden Fairies watches over the scene in the upper left corner.  I painted the chipboard frame that surrounds the opening with a light coat of gesso followed by Lumiere paints in gold and lavender shades.  The fairy is embossed with shabby beige embossing powder over some glass beads in the wings area.  I also rubbed on some Inka Gold.  Thanks for looking!


Gina's Designs Products Used:

Other:
Design paper by BoBunny - C'est La Vie Collection
Lumiere paints by Jacquard
Flowers by Recollections and Petaloo
Bird Nest, Resin Topiary and Deer by Prima
Butterflies and Dragonfly by Renea Bouquets


Thursday, October 30, 2014

Window Shadowbox in a Sewing Theme for Gina's Designs

Hello Crafty Friends!  Today I am sharing a customized version of the Window Shadowbox by Gina's Designs.   This was an original piece that I'd had in my stash for quite some time, just waiting for that right moment of inspiration to come along.  In this version of the shadowbox, there is a dividing shelf across the center creating two areas to decorate.  You can request to have your shadowbox divided in the center as in this piece, or you can purchase it the way it is currently shown in the store, with no center shelf, to create a large window view of anywhere your imagination takes you.  


I kept the chipboard technique simple on this piece because lots was already going on inside the box.  I covered all of my chipboard with a light coat of gesso using a dry brush, script stamped with perfect medium, then colored with perfect pearls.  Simple but effective, this technique worked perfectly to compliment this piece.


Gina's Designs Products Used:

Window Shadowbox *customized version


Parchment flowers (upper left) from Craftsupplies1 on Etsy or Zibbet

Thursday, October 23, 2014

Steampunk Canvas for Gina's Designs


Today I'm sharing an altered inverted 8 x 10 canvas that I created in a fun Steampunk style.  The adorable image and the papers behind it were digital freebies from Ephemera's Vintage Garden.  I thought that the Steampunk chipboard shapes from Gina's Designs really complimented this image.  I used the techniques described below on the chipboard shapes.


The butterfly, the hot air balloon, and the gears corner at bottom right were first given a light coat of gesso.  I always use a light touch with the gesso, usually just a dry brushing with a fan brush,  because I like the natural shading it provides when some of the natural chip color is coming through.  I then used a variety of different colored gelatos on the butterfly.  I blended the colors with a touch of water then let it dry.  To get the distressed and grungy look I was after, I sanded it back so some gesso showed through.  I followed that with a touch of Prima chalk ink in a burnt orange color.  By that point you couldn't even tell that I'd ever used the gelatos, but that's OK because with each layer of color you add, you'll get more depth and dimension as an end result.  I added a bit of stickles here and there, some bead connectors and I coiled some copper wire for antennae.  

On the balloon, I stamped a script stamp with perfect medium, then added shades of perfect pearls.  It has a beautiful sheen to it that doesn't show in the photos.  For the balloon overlay I embossed with copper embossing powder, sanded some of it off, then touched it up with Prima Chalk Ink in burnt orange.  

For the gears, I simply ran it through my Big Shot in a dry embossing folder, then rubbed it with different shades of Gilder's Paste.

For the chipboard Word Ribbon Title of "Explore", I rubbed the raw chipboard with Prima Chalk Ink in the burnt orange shade, added a touch of Tim Holtz tarnished brass Distress Paint then rubbed gesso over the letters.

To add texture to the image itself, I used a grungy edge stamp with shabby white embossing powder to make it look like ocean foam, and then I added some amber frosted flat back pearls.

To create the texture on the frame of the inverted canvas, I began by using matte Mod Podge to apply torn papers in colors to match the project all around the frame covering the staples.  I then dry brushed gesso over the paper using a light touch.  I followed with some Art Anthology dimensional sorbet paint applied through a stencil all over the frame.  I trimmed in some of the blank spaces with Tim Holtz distress paint in tarnished brass to highlight.  I added gel medium and applied glass beads and some little stones (lower left corner)

I made the grungy flower at left with the spikey shapes of the Tim Holtz Tattered floral die (I cut two), and in the center I used a Sizzix daisy die (I cut two), and punched out sun shapes for the center (I punched out three), then I added some glass beads.  The flower at right is just a simple rolled rose by Die-namics.

Thanks for looking!

Gina's Designs Products Used:


Thursday, October 16, 2014

Lila's Wish - A Layout featuring Gina's Designs and Craftsupplies1

Today I'm sharing a layout featuring my cat Delilah for the October cross promotional project with Gina's Designs and Craftsupplies1.  The beautiful parchment flower and leaf clusters from Craftsupplies1, combined perfectly with the chipboard bird cages and flourishes from Gina's Designs.  I painted my chipboard with a light coat of gesso, then colored the pieces with gelatos and a touch of Prima chalk inks.  The crocheted doily underneath the flower cluster at the bottom left is also from craftsupplies1 and came in a package of assorted doilies in different sizes.  The design papers and the doily behind the photo are from the Scraps of Darkness kit club.  


Gina's Designs Products Used:


Craftsupplies1

Other:
Butterflies by Renea Bouquets
Scraps of Darkness Kit Club
Wooden bird by Pork Shop Show
Paper by Fabscraps - Paint Chic Collection
Sizzix Die (Wish)
Hanging Charm by Prima Vintage Trinkets

Tuesday, September 23, 2014

Halloween Graveyard - Design Team for Gina's Designs

This Standing Dome from the Home Decor section of Gina's Designs, comes in two styles.  This one has a solid back and the other style has a framed opening at the back.  I love both of them, but this one in particular, because it does remind me of a tombstone.  The piece wasn't designed for Halloween necessarily, but I couldn't help myself.  The 4-inch depth seemed like such a likely spot for these skeletons to hang out.  


I painted the assembled piece black, then dry brushed some orange in places.  I also adhered some packaged spider webbing from the Halloween section of the dollar store with gel medium for extra texture, and melted it into the paints with my heat gun.  I also spread on a bit of glass bead gel and brass colored distress paint.  For the mossy look I added green acrylic paint with a dry brush.   I don't usually start with a plan, I just keep adding color and texture until I achieve the look I want.

Gina's Designs Products Used:

Collage Sheet Images by:
Seneca Pond Crafts
Alpha Stamps

Tuesday, September 16, 2014

Halloween Stage - Design Team Project for Gina's Designs

Hello Everyone, Today I'm sharing one of my favorite pieces from the Altered Art section of our store.  This is my second time working with the Stage.  This time around  I chose to create a Halloween project since it's my favorite theme to scrap this time of year.  


I began by painting my assembled stage in black, then I papered it with The Enchanted Collection by Authentique.  To decorate my stage I used various collage sheet images, and Gina's Designs chipboard shapes. 


Thanks for looking!

Gina's Designs Products Used:

Beach Shape Set (I used a portion of the fence)


Collage Sheet images from:
Retro Cafe Art
Seneca Pond Crafts


Alpha Stamps

Monday, August 25, 2014

Mini Album "Heart Break" Paris Style for August Cross Promo

Hello Everyone!  Today I'm sharing another cross promotional project pairing Gina's Design's chipboard with digital papers from Kitty's Scrap Post.  This is my third project this month using the awesome papers in the Heartbreak kit.


Above:  The cover using fussy cut images from the Heartbreak digital paper kit and Gina's Designs Texture Sheet - Diamond Pattern, deco corners, and the word "Love" from the 10 words set.


Above:  Background paper and images from the digital paper kit.  Photo book tucked inside pocket featuring a chipboard cameo by Gina's Designs embossed in shabby aged silver.


Above:  A flip-up page featuring sentiment,  corset and mirror by Gina's Designs.  Perfume bottle is fussy cut from the digital papers, and also background paper is from the collection.  All design elements are unattached in the photo mat area, so a photo can be slipped onto the mat.


Above:  Gina's Designs chair and dressform, the perfume bottle, image of lady and background paper are from the digital paper collection.   All design elements are unattached in the photo mat area, so a photo can be slipped onto the mat.


Above:  Another cameo from Gina's Designs placed on an image fussy cut from the collection


Above:  The image opens up to display more gorgeous images from the collection.


Above:  More images from the collection and a chipboard Fleur de lis and Paris elements from Gina's Designs.


Above:  A flip page featuring papers from the collection (you can see the inside of this page and more on my blog) and Eiffel Tower by Gina's Designs.  On the adjoining page I have a side pocket featuring doilies from Gina's Designs in black, and also a silhouette lady has been script stamped. 


More gorgeous images from the collection on this flip out page, and below is the final page, with tag removed to reveal a transparency with an image from the collection slipped inside which could be replaced with a photo.

This mini album was so much fun to create, thanks so much for looking!


Gina's Designs Products used:


Digital Design Papers by Kitty's Scrap Post

Other:
Dark Red Latex Roses and White Pearl Trim by Craftsupplies1
White Feather Flower on cover by Tresors deLuxe


Tuesday, August 19, 2014

Halloween Themed Composition Box by Gina's Designs


Hello Crafty Friends!  Today I'm sharing my version of the Composition Box by Gina's Designs.  Halloween is my favorite time of the year to scrap.  There are so many fun Halloween themes, and it's so hard to chose between witches, vamps, zombies, and other ghoulish themes,  that I usually end up making many projects during the Autumn months.  I knew as soon as Gina designed this awesome piece, exactly which numbers I'd choose.


Gina's Designs Products used:

Other:
Tim Holtz Halloween-themed stamps, rub-ons, and die
Collage sheets from Alpha Stamps
Collage sheet from Raiders of the Lost Art


Tuesday, August 12, 2014

A 12 x 12 Framed Layout for Gina's Designs and Kitty's Scrap Post

Hi Crafty Friends!  Today I'm sharing a layout I created using Gina's Designs chipboard and a digital paper kit from Kitty's Scrap Post.  I really enjoy printing my own papers, it's so much more versatile.  This paper kit is gorgeous combined with some Parisian chipboard shapes from Gina's Designs.  I'd been wanting to use our large chipboard Eiffel tower, as well as the pen and ink set, so I was really excited when I saw this paper.   I really love using the unfinished wooden frames from Michael's to enhance my layouts and to give me more room to play with some mixed media techniques.  

To decorate my frame on this project, I printed out some of the design paper onto tissue paper and decoupaged it around the frame.  I simply place  double stick tape on each end of a sheet of printer paper (I used my ATG gun), then lay a sheet of tissue paper over it.  Trim off excess tissue paper before inserting the sheet into your printer.  Over the decoupage I added gesso, and stenciling with crackle paste, and a little stamping here and there.  I also fussy cut some of the elements from the collage sheets included in the kit and incorporated them into my layout and around the frame.  I used my photo printer with matte photo paper to print the vintage lady image which is also included in the kit.  I created the flowers at the bottom right of the frame using dies and leftover scraps of paper from the collection.  


Monday, August 4, 2014

Gina's Designs August Sketch Challenge and Twilight Layout

Welcome to the August Sketch Challenge for Gina's Designs!

Each month, on the first Monday, a new sketch will be provided.  Use the sketch to create a layout, card or other craft project.  Winner will be drawn from all eligible entries and will receive a $10 gift certificate to Gina's Designs online store.  We encourage you to use Gina's Designs products in your project but it is not required to be eligible to win.  You have until the first Monday of the Following month to enter and the winner will be announced on the blog on the second Monday of the following month.  Use the Link Up tool below to enter.
Here is the sketch for August.

Below is my take on the sketch.  I received this gorgeous paper kit from Kitty's Scrap Post as part of our month-long August promotional.  When I saw all the red, black and white,  I couldn't help but think of how much I missed scrapping Twilight.  The kit contains background papers as well as element sheets that can be cut up and added to your project.  This kit has a lot of vintage Paris elements, and Valentine or love themed elements but with a Gothic flair.  The paper kit goes perfectly with many of the chipboard shapes from Gina's Designs, especially those in a Paris theme, as you will see in upcoming project I'm currently working on for later this month.


Gina's Designs Products Used:


Digital Paper Kit by Kitty's Scrap Post


Tuesday, July 29, 2014

Key and Crest Wall Hanging for Gina's Designs

Hi Everyone!  Today I am sharing a vintage heritage project.  I thought these photos of my Dad and my Granddad, would be perfect to display on our new Key and Crest Wall hanging.  This is a good sized piece to work with, about 12 inches across.  I am really happy with how it turned out, and it's a keepsake since my Dad and Granddad are no longer with us.


 I used several products to get the look I wanted for the key and crest, meaning the scrolled areas and the key.   The center area was papered with the DCWV Timeless Type Stack.    I began by using a fan shaped brush to achieve a light dry coat of gesso (at that point some raw chipboard still shows through).  Next I covered the whole piece with a bright turquoise luminescent type paint.  Following that I dry brushed a bit of bright orange here and there.   Next I embossed over everything with Tim Holtz vintage photo distress embossing powder.  Following that step I stamped over the whole piece with a burlap textured stamp,  and embossed those areas with copper colored embossing powder.  I then rubbed Gold colored Gilder's Paste all along the edges.  Thanks for looking!


Gina's Designs Products Used:


Tuesday, July 22, 2014

12 x 12 Layout in a Shadowbox Frame

Today I'm sharing a project that is personal to me.   The main photo is me as a little girl, with Mom in the oval frame.  I'm calling this piece "The Dressmaker's Daughter".  When I was young, my Mom made all of my dresses and I used to model them in fashion show competitions.  I really enjoyed it, and I continued modeling on department store runways well into my 20's.  

This project began as an unfinished shadowbox frame I purchased at Michael's.  I painted the frame with gesso,  then I did some stenciling with modeling paste, some stamping and some spraying until I got the look I wanted.  The papers I used on the layout are from the French Seamstress Kit at Kitty's Scrap Post.  I really love this digital paper kit and this is my second project using it.  I also did some fussy cutting of elements from the kit like spools, thimbles, birdcage, flowers, etc, and of course you'll find plenty of Gina's chippies on it too.  The shadowbox is fairly deep so I added measuring tape and some wooden spools to the inside.   Thanks for looking!


Gina's Design Products Used:


Design paper by Kitty's Scrap Post - The French Seamstress Kit
Latex roses in two tone blue on upper right of layout by Craftsupplies1
Lace Appliques by Cathy's Crazy by Design on Etsy

Tuesday, July 15, 2014

Artist Trading Blocks for Gina's Designs

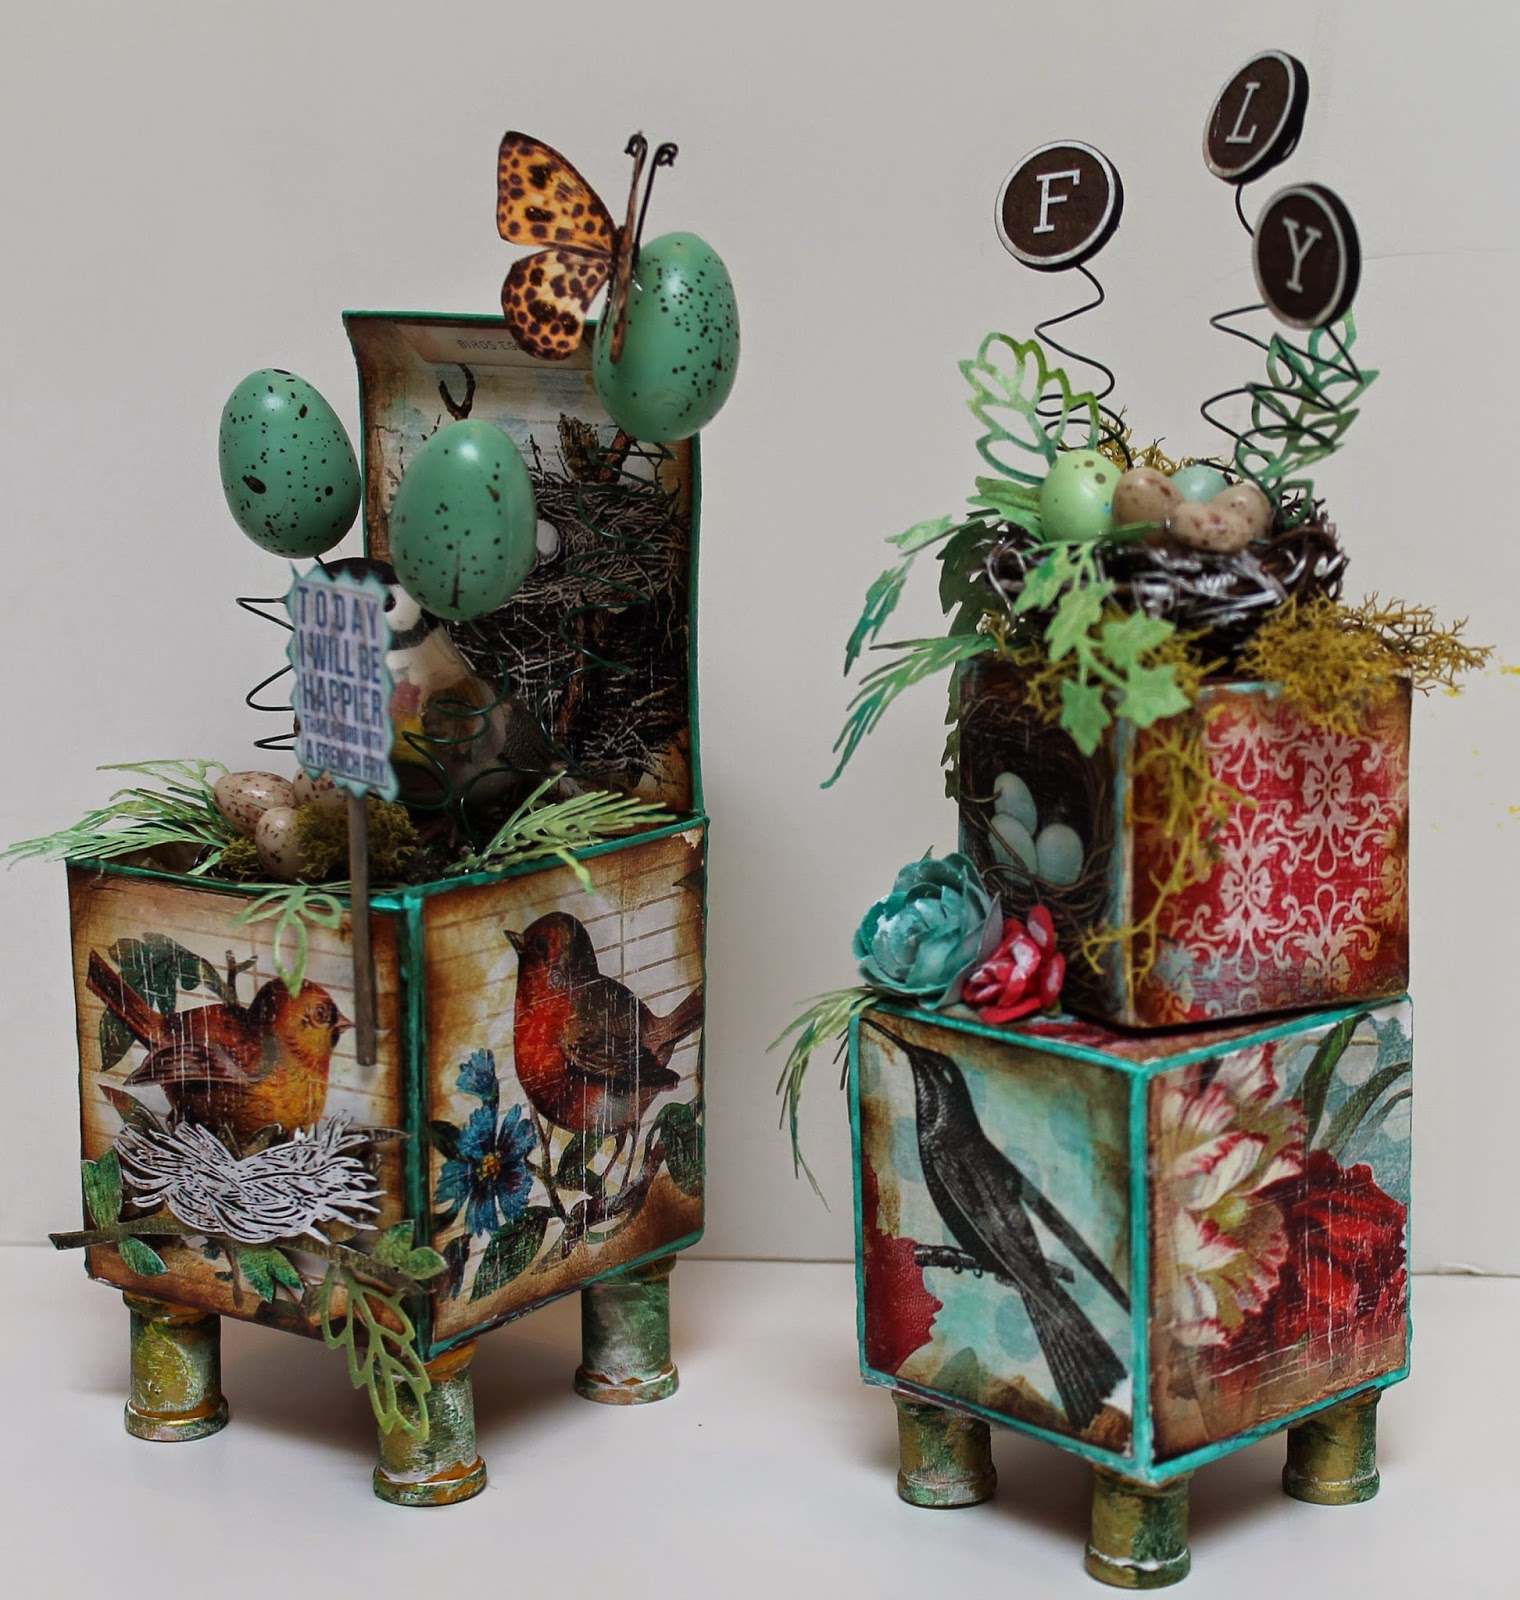
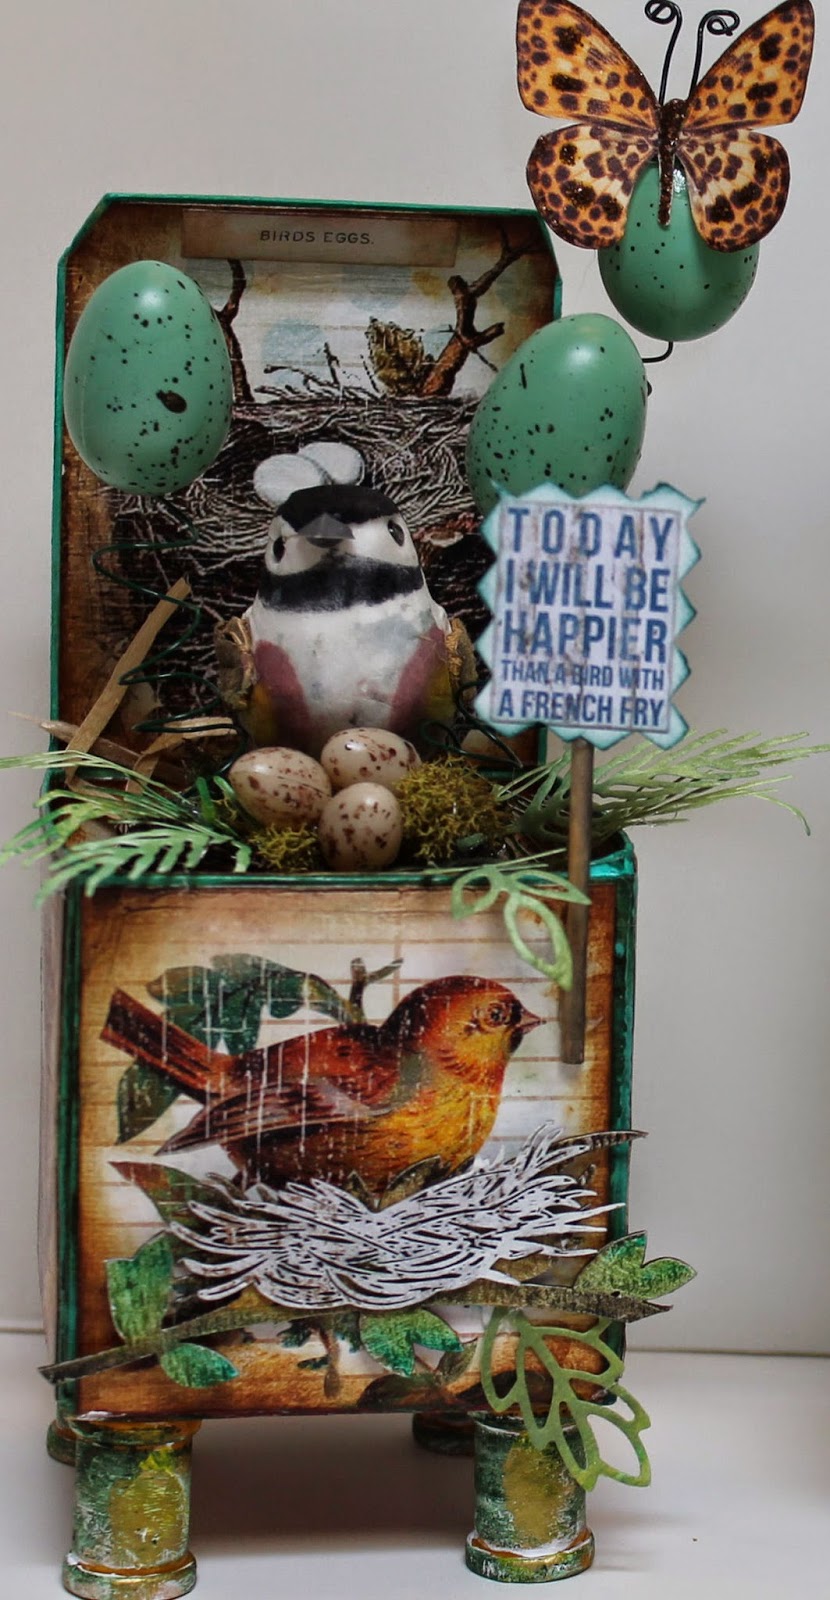
Hello Friends!  The team at Gina's Designs have been sharing these Artist Trading Blocks all this month, and it's been amazing to see all the different versions of these fun and versatile blocks.  I decided on a bird theme for mine.  I used the large block separately and left the top cover open,  and I stacked the smaller ones together.  The blocks are made of chipboard and come ready to assemble using the pre-scored fold lines.  I used red line tape to assemble my blocks.  Once assembled,  I covered the blocks completely with gesso to help build a firmer and sturdier surface.  I also "frosted" over the seams lightly with modeling paste and a painters spatula, then I painted and inked the edges.  I used matte Mod Podge to apply the paper, and I also put a heavy coat of the Mod Podge on top of the paper.   My end result were blocks that are very solid and sturdy like wood!

I chose digital papers in a colorful bird theme from Ephemera's Vintage Garden to cover my blocks.  I love the vivid images of birds and nests!  For the feet, I glued wooden spools to the bottom of the blocks then painted them with gesso followed by Tim Holtz dabber paint in copper.  I toned that color down with Gilder's Paste in Verdigris and in Patina.  I also rubbed on some extra gesso to further distress the feet.


  Following the prep work, I had a lot of fun decorating my blocks with  3-D birds, nests and eggs from the floral dept. at JoAnn's to complement the images on the design papers.   I felt that I needed some greenery so I die cut vines and ferns, and then I coiled some green wire by wrapping it around the handle of a large artist's brush and attaching it to the bottom of my bird nests on both blocks.  To the top of the coils I added eggs on the large block and the letters "FLY" on the smaller set.


Gina's Designs Products Used:

Other:
Design Paper by Ephemera's Vintage Garden -  Spring Chic Collection
Vine Die by Marianne Creatables
Fern and Leaf Die by Marianne Creatables
Leopard Butterfly by Renea Bouquets


Monday, July 7, 2014

July Sketch Challenge at Gina's Designs Blogspot

Welcome to the July Sketch Challenge at Gina's Designs!

Each month, on the first Monday, a new sketch will be provided.  Use the sketch to create a layout, card or other craft project.  Winner will be drawn from all eligible entries and will receive a $10 gift certificate to Gina's Designs online store.  We encourage you to use Gina's Designs products in your project but it is not required to be eligible to win.  You have until the first Monday of the Following month to enter and the winner will be announced on the blog on the second Monday of the following month.  Use the Link Up tool below to enter.
Here is the sketch for July


Here is my take on the sketch.  This month I decided to create a memorial layout for some of my favorite furry freinds who have passed on in recent years.  I am featuring one of our new ribbon titles, our chipboard bridge, and our Queen Anne's Lace.


Gina's Designs Products Used:


Monday, June 30, 2014

Vintage Seamstress - Sewing Themed Altered Cigar Box

Hi everyone! Today I am sharing an altered cigar box using papers from digital files that I have printed myself.  This coming August,  the Gina's Designs team will be participating in a cross promotional using digital designs by Kitty's Scrap Post.  We were excited to find out that in addition to each of us picking our choice of a digital  kit to work with for our August projects, all of us received the French Seamstress Kit as an extra bonus.   When I saw this gorgeous French Seamstress kit,  I just knew I had to combine the papers with Gina's sewing themed chipboard shapes.  A match made in Crafty Heaven!

 I'd been wanting a box to store my vintage Czech glass button collection and other sewing related collectibles I have accumulated, so I dug out this cigar box from my stash, and went to work.  I'm so happy with the way it turned out.  The box measures 7" x 7.5" x 4" deep.

I began by covering the box both inside and out, even the bottom got papered.  The best thing about digital papers is that you can print them as many times as you want to.  Just look how pretty the images are in this collection!

After the box was papered, everything got two coats of matte Mod Podge so the box can be wiped clean with a wet cloth.  Several techniques (as described below each photo) were used to decorate the chipboard shapes.


The dressform on the top of the box was embossed with Stampendous Shabby Pink Embossing Powder.  Closeup view of the top below:

Aren't the papers gorgeous!  In addition to the dressform, I simply added a few Recollections flowers and fabric leaves.

On the front of the box I added more chipboard shapes and a few buttons to blend in with the button print on the paper.  Here the chippies were painted with Folk art acrylics.  Metal bookplate by Recollections and metal feet by Tim Holtz were painted with gesso and green acrylic paint.

On this side of the box I added the button border from Gina's Designs, and embossed it with Stampendous Shabby White, Pink, and Blue alternately.

On this side, I added a skeleton clock and clock hands embossed with Stampendous Shabby White embossing powder.  The chipboard clock mimics the clock and clock hands design on the paper.

On this side, I added scissors and another dressform.  The dressform is embossed with Shabby Blue, and the scissors with Shabby Marine (handles) and with a brass color embossing powder for the blades.

Here's a view of the inside! I'm all ready to add my collection of buttons and things!


Closeup of the inside lid.  On these shapes,  I have painted first with Gesso, stamped with a script stamp and then inked with pale pink and pale blue inks from Recollections new Vintage Romance collection of products.

Inside of the box at the bottom is another gorgeous design from the kit.  It was so hard to decide which paper to use on the top!

I hope you like my project, and be sure to visit us at Gina's Designs, and also check out all the gorgeous digital paper collections at Kitty's Scrap Post.

Gina's Designs Products Used:


Other:

Digital Design Papers by Kitty's Scrap Post